Easy DIY Outdoor Banquette/Bench
The big game changer in our outdoor patio makeover was the addition of the banquette. Without this bench, the table and chair set blocked the flow of traffic through the screen porch door.

Now with the bench seating in the nook created by the fireplace inside and the porch to the right, the table can be tucked further back in the space and out of the way.

Want to know the best part about this banquette? It is a super easy DIY project you could definitely do in a short weekend.
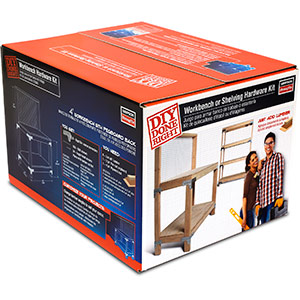
The project starts simply with the use of a Workbench or Shelving Hardware Kit from Simpson Strong-Tie.
Because of the long expanse of space we covered, 104 inches, we needed additional connectors for extra support. Here’s a step by step run down of how we built it. I decided not to do plan drawings, as the beauty of this type of project is building it custom to fit your needs.
How to build a custom outdoor banquette in 10 easy steps!
1. Cut your lengths and widths according to the space you have available. Our nook, where the bench was to be inserted, is 104 inches long. We chose a depth of 18″ based on an average sized outdoor bench cushion. Likewise, a comfortable height of 18″ was used.

2. The easy to follow instructions included in the Simpson Strong Tie kit walk you through the process of building the base very thoroughly. We have found through building this and other projects using connectors that it is important to use clamps when attaching main connectors as described. Even with two people working together, the clamp does a better job of holding the conector flush and properly in place while you add the screws.

Tip: Because this is an outdoor application, using pressure treated lumber, you will want to build your bench fairly close to where it is going to be installed. It will be rather heavy.
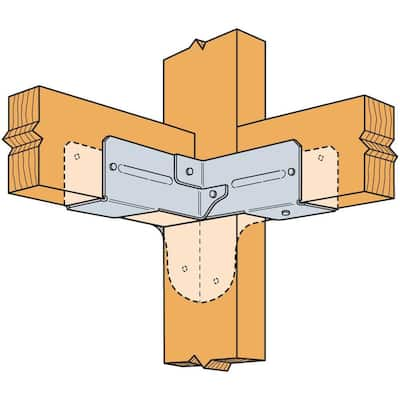
3. Continue as directed adding the top rail supports, both horizontally and vertically. With these connectors, even the most novice of builders can easily create a perfect right angle every time. As you screw into the connectors, you’ll see, almost magically, the angles become nice and tight.

These connectors, RTC2Z are also sold individually and look like this. You will need 8 or the kit.
4. Here’s where we start to deviate from the plans. Instead of attaching a solid surface top, we opted to use the 2×4’s as slats. To give extra support to the slats, we added 4 2×4’s connected with the PF24Z connector.


5. Now that we had plenty of support for the seating, we added the slats. We just screwed the slats directly to the top, using galvanized flat head screws. Using slats reduces the chance of standing water on top of the bench and allow air flow to allow the cushions to dry. 
Here’s what the top looks like from the underside.
6. We added 4 extra supports between the top and bottom rails because our bench covered a very long area. For this we used 16 ZMAX 18 gauge galvanized steel angle connectors. Although we only used one per angle, not like the drawing shown below.


Tip: These structural connector screws from Simpson Strong-Tie are definitely superior to traditional galvanized screws. You do need a special bit for your screwdriver, but you never have to worry about stripping a screw.

Here is a close up of what the bench looked like before it was clad to match the house. (It’s laying on it’s side here and you will notice a lip where the top slat meets the bench. We ended up moving it back so that it was flush with the front. This allowed us to apply the cement board to the front going all the way up to the top. We made this change because new treated lumber does not accept paint very well.)

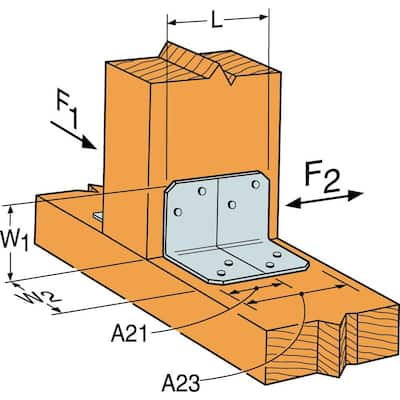
7. Add the FB24Z Fence Brackets as feet on the base of each leg. This ensures long term durability by keeping the wood from coming in direct contact with the cement, . You can see them on the photo above.

Now this is where our little project hit a snag. I wanted the bench to be clad in Hardie Plank that exactly matched the siding already on the house. However, after locating a dealer who was willing to sell me a small quantity and was quoted a price that was a bit ridiculous, we decided to explore other options. It just didn’t make sense to spend such an exorbitant amount of money just to have it match. Especially since the base of the table is only slightly visable once the table and chairs were in place.
 We opted to use an in-stock cement board from Home Depot and painted it using an exterior pain color matched to the existing plank. We removed a piece of Hardie Plank that would be covered by the bench in order to bring it in to be matched. Once we were done we simply nailed it back into place.
8. Cut and nail cement board to the front of your bench. Trim out the edges with 1×3 pine.

9. Caulk and paint.

Be sure to spay special attention while caulking the edge between the treated lumber and the trim to keep water from dripping into the crack.

10. Add your cushions and enjoy!

But wait! Do you see that planter at the end of the right hand side? How and why is that there???
I decided I did not want to sew my own custom cushions for this project. I knew I was going to be sewing all of the seat back cushions and most of the other pillows for the outdoor sofa and didn’t want to be bothered with sewing the box cushion at this time. Luckily, I found bench cushions made by Smith and Hawkin at Target that were the exact same fabric as the main pillows I purchased for the sofa on the porch last year.

Here’s the dilemma though. Two of the large cushions were not big enough to cover the full length of the bench. So, I decided to fill the extra space with a planter as you can see below.

After the cushions arrived, I went shopping for a rectangular planter box to fit the general dimensions I had leftover. I easily found what I was looking for at Home Depot. Then, we just trimmed out the area with ripped 2×4’s to make it flush with the bench and painted it out.

I recently had another great idea! I’m going to buy an extra planter just like this one to use as an ice bucket to hold extra drinks for parties!!
The moral to this story is to plan, plan, plan. I promise you the planning took much longer than the actual project, but in the end it was definitely worth the effort.

Ready for the best part??
I’ve teamed up with Simpson Strong-Tie to get you started on building your own custom bench/banquette, work bench, or even shelving unit, if that’s what you need. This kit is so versatile, you are limited only to your imagination and your needs!
WIN THIS KIT
US Residents Only
As a compensation for this post, I was gifted the Simpson Strong-Tie connectors. This post also includes affiliate links. Bench design and opinions are my own. I only endorse products I believe to be extremely helpful to you, my cherished readers.


It looks awesome!
Love the bench and the planter, maybe hubby will build one for me…
Thanks for sharing this tutorial. I wish I had a space between two walls on our back patio where we can incorporate this. It looks so nice!
Jennifer, If you have a bit of space you could still build one. Mine isn’t actually attached to the wall in any way. The Strong-Ties are so stable that there was no need to. We just built it to fit rather snuggly to the sides!
that is so impressive. i loooove the plant stand idea, and the ice bucket, too. the bench makes such good use of your space. enjoy!
b
I have a perfect spot to use this kit to build a bench.
I would love to help my hubby build this great bench!!!
I would build this bench.
I would build the planter! (or, actually, my husband would!)
I would build a bench
Looks like so much fun Love DIY projects my husband and I are in the process of redecorating remodeling our home Would love to do this!
I would give this to my dad for father’s day and let him decide 🙂 he would probably want to build the bench for in our garden! I would love to win this great prize!
You bet I would build a bench for our back patio…PERFECT addition!~
I love the bench!!! I also love the Customized Wood Planter Box!!!
I would like hubby to build the bench. I would like to build the Wood Planter Box.
I would build the bench with the planter and a back lattice attached to hide our swimming pool equipment!
I would build the bench, it would be perfect for my back yard by my pool.
Would build it
fun DIY projects to do
I would definately build the bench!
This is an awesome giveaway. I would build a bench just like that one I love it.. I have the perfect spot for this on my paito..
This is a real tough call ~ as we really NEED both ~ in fact in the case of the planter we need like four or five of them! I think I let my wood-working husband decide ~ or maybe just flip a coin! THANKS for the very thoughtful and generous giveaway!!!
I am also VERY interested in building both a new desk and / or Work (PROJECT) Station. But even more pressing is that we HAVE TO repair and reinforce our decaying wood fence!
Can you just come to my house and help me build it please? I am awful at projects. This one is something I have been wanting to do on our deck for a couple years now. Yours turned out beautifully! Great job!
Rebecca,
I bet you can handle this project. The Simpson Strong Ties make it super easy to get it square and it comes together really quickly, kind of like tinker toys with a screwdriver! Ha! Then, it’s just a matter of adding siding to make it look pretty. Give it a go!