Modern Barn Door Hardware Review and Instructions
How to Install Barn Door hardware

Let me be right upfront and say this is not at all a sponsored post. We just happened to have found, what we think, is exceptional barn door hardware and want to share our experience and also provide comprehensive instructions. We love the look of ours and know it can be the perfect solution for so many problem entries.
Modern Stainless Steel Interior Sliding Barn Wooden Door Hardware Track Set.

(The links found in the post are affiliate links. Please look for the complete shopping list at end of post.)
The construction and materials are high-quality stainless steel, but most noteworthy is the relatively inexpensive price, it’s now around $90 with free shipping! Many of the hardware options from other companies were at least double or triple the price of this hardware!

They have provided the perfect solution for our awkward entries in our master ensuite area. Read more about that here.
You may be asking, “Why didn’t you choose to DIY the barn door hardware?” The answer is simple; we needed the slides to be completely quiet because it is the entrance to our master ensuite. We don’t always keep the same morning schedules and the whole point of replacing the existing awkward doors was to gain some peace and quiet. Y’all know that means I wanted to be able to sleep in, right?

And now I must confess a bit of ignorance when it comes to barn door hardware.
It’s been brought to my attention through several questions/comments I received since the initial reveal, that most barn door hardware requires either a removal of the existing door trim or an extra piece of wood to allow for a clearance between the door and the trim. I chose a top-mounted barn door hardware, purely because of the modern aesthetic, but the top-mounted barn door hardware is the only reason we were able to keep the existing trim.

I’m sure that door trim varies in thickness, but our trim is only about 9/16″ thick and has just enough clearance for the door to slide without touching at the top. I’ll address the bottom of the door later.
The one thing we both agreed this hardware lacked was detailed instructions. The barn door hardware is not exceptionally difficult to hang. In fact, the second and third door went up extremely fast.

So we thought if we were going to tout this barn door hardware we ought to share a few helpful tips and things we learned during the hanging of our three doors. Because honestly, this little sheet of instructions was painfully inadequate for our installation.
The tools you will need to hang your doors and hardware are:
A level, stud finder, drill, screwdriver, tape measure with millimeters.
Here are some key takeaway points after you’ve “read” the instructions.
Instructions & Tips for Installing Barn Door Hardware
1. Do some thinking up front about where your studs fall in correlation to where the barn door will sit when open and closed. Thankfully before we had gone too far in our installation, we realized we were about to hang the bar too far to the left of the opening.

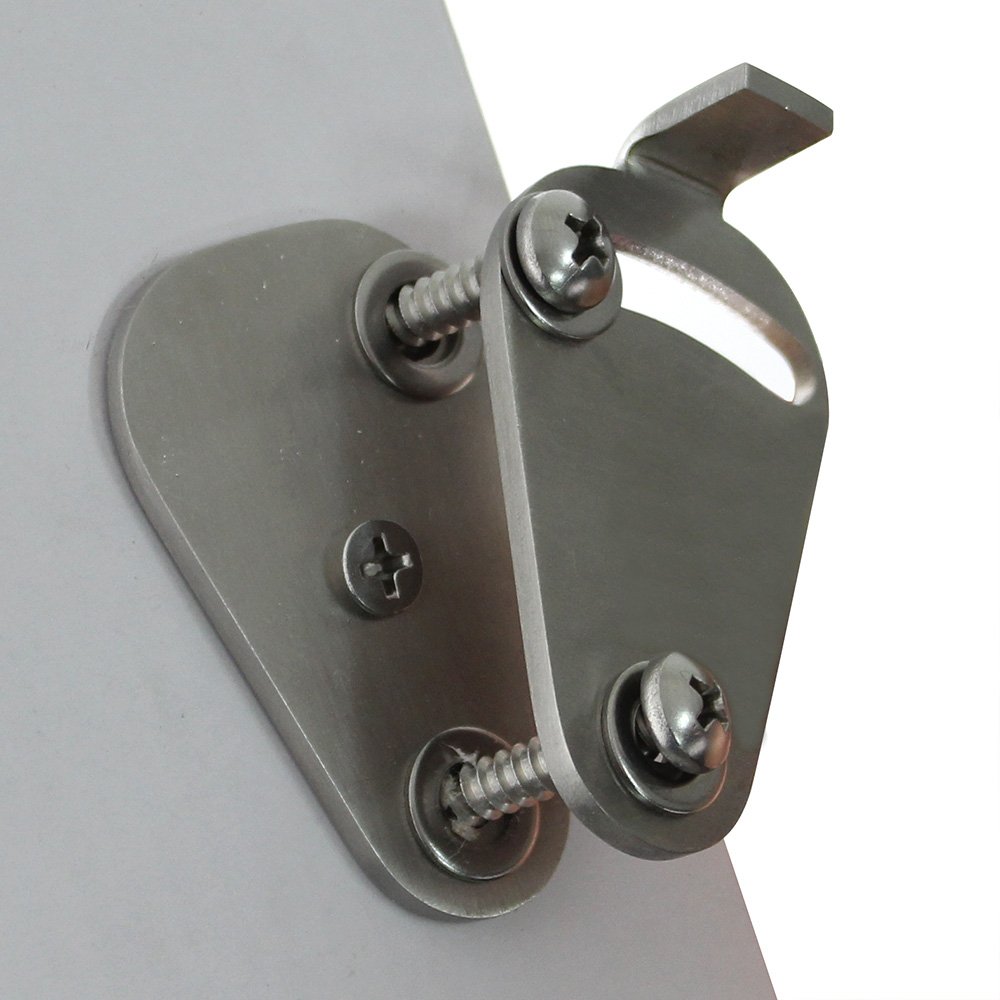
As you can start to see from the photo above, each bracket has 3 pieces. One that screws into the stud and outer piece that screws in the first bracket to form a cup for the bar to sit. Additionally, each cup has a rubber spacer that fits in between the two metal brackets.
2. Make a rough estimate & get a measurement on where your included door stops will need to be placed in order to stop your door from going too far on the rod.

Instinctively, when we were hanging the first door, we put the stop at the end of the rod. But the stop is meant to hit the door hanging hardware which is centered over the door like below.

If you have to move the door stops past one of the brackets, you will essentially need to unscrew all of the brackets, remove the rubber spacer and take the steel rod off to move the doorstop to the proper place. Not hard, just tedious, trust me.
3. Constantly check for level. When you mark your studs, when you hang the bar, make sure your rod is level. If it is off, your door will want to slide on its own.

This barn door hardware is solidly built with the wheels that are meant to glide quietly over the bar. The hardware attaches to the top of the door with the brackets shown below.

They attach to the door with heavy-duty screws.
4. The holes in your doors need to be perfectly straight as they go into the door top to hang properly. Because we had concerns over this issue, we performed a test run on scrap plywood nailed and glued together just as our doors are.

We discovered that if you went in with a drill bit the size needed for the screw, the drill tended to hop around. In order to keep the hole straight and level, we incrementally increased the diameter of the drill bit.
If you want plans to build a door, like we did from one sheet of plywood for under $50, check out this post, click here. Note: This figure is for one door under 32″ wide. Our large door took two sheets of plywood.
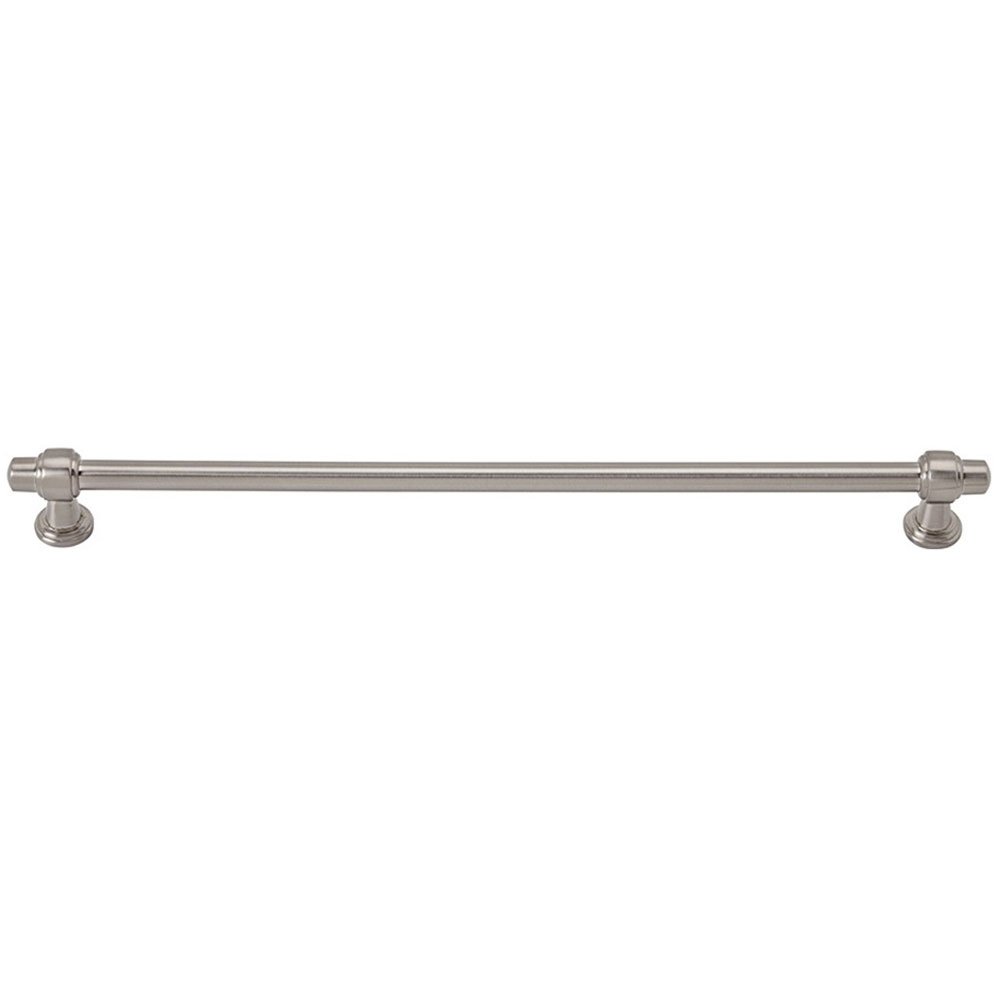
5. The kit comes with door “knobs”, but we decided to upgrade to a pull on the main entry door.
For a full description of how we attached the doorknobs and countersunk them into the doors, we built, click here.
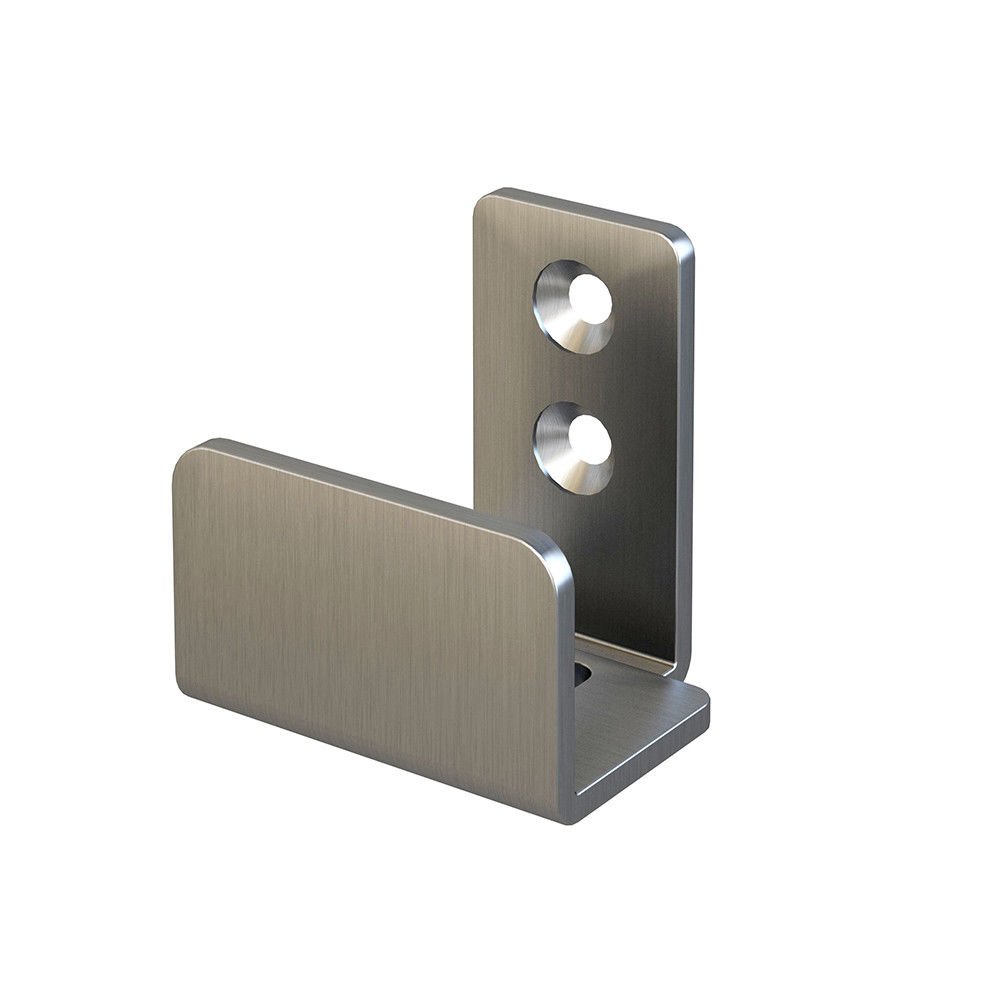
6. Lastly, we needed to address the tiny bit of sway that is created from the weight of the door. The hardware comes with a bottom door guide which is super handy.

But it was not wide enough for the door we built and the glides were too short. Or we made our door too short, depends on how you look at it, I guess. We also had carpet under the door, so mounting it to the floor wasn’t ideal.

This simple mechanism uses the plastic “wheels” that spin on the little rods to allow the door to roll along, keeping it from swaying ever so slightly towards the door frame.
Below are links to hardware we used as well as other
helpful parts.
Barn Door HardwareSliding Door Lock
Wall Mounted Door Guide
Bar Handle
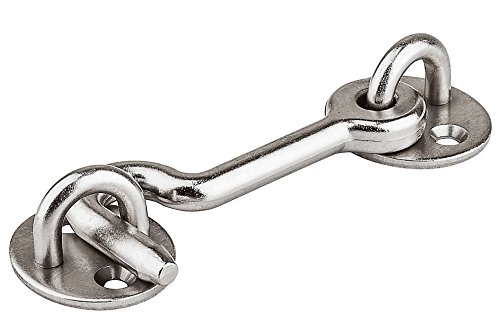
Hook Style Lock

Edited: When this tutorial was written there were very few products available for solving this problem. Now there are a plethora of styles of door guides. See above for suggestions of what I would purchase now.
It took us a little while to figure out our solution, but we ended up removing the glide screw/rods from the metal as they came (using an Allen wrench to unscrew them) and attaching them to a block of wood. The block of wood is attached to the base molding with a simple “L” bracket.

That left only one little, but one troublesome problem to solve. While the wheels at the top of the door slide nearly inaudibly over the steel rod, the little plastic wheel guide at the bottom grated noisily along the backside of the door. (I also provide a link to an alternative below.)
After much deliberation over what type of rubber wheel or little toy piece could be used for a more quiet opening than the original, Richard recalled the small rubber gaskets (also called “o” rings) used on the faucets he installed in our phase 1 of the bathroom remodel.

Here’s what our package looked like.

For just a few dollars in rubber gaskets, we had a perfectly quiet door again! And I was super happy.
While I love the look of rustic barn doors, many of us don’t live in homes where this look is in keeping with the style of the rest of the house. I think the design we chose is the perfect solution in those cases where a clean-lined look is needed, while still adding the functionality of a sliding door for a traditional to transitional style home.
So are you ready to embrace the function and ease of barn door living? I’d love to hear about it!
(This post include affiliate links, which means if you make a purchase after clicking the link, I get a very small commission and I would be grateful for your support.)


this is gorgeous! I love barn doors!
Nice job and great tips for installing the door.
Erlene, Glad you found these tips helpful!
I LOVE the look of barn doors. I’ve been seeing a ton of these used on DIY and HGTV! I want to do it in my next house for sure.
Love the post but the link to the hardware isn’t working. I’d be interested, if you’d like to fix that!
Laurabeth,
Thank you for letting me know. I think I’ve got them fixed. Hope you love them as much as we do. It is truly a great product.
Yes, what Laurabeth said – affiliate link isn’t working for me either!
Jason,
I think I’ve got it fixed. Thanks and good luck with your barn doors!!
So, ignore my last question- I totally missed the color palette. On your first page. Right in front of me. Lol.
I think the bottom door slide is not build to have a door go through the middle. It is the way around. I think the door slide supposed to go through the middle of the door – make a slide in the bottom of the door.
So does your bathroom door lock at all?
We have not installed any kind of lock on our door. Just haven’t felt the need since we have teenagers who would not dare to open a door.:) Also, we if we felt it was necessary we could lock the bedroom door. If I had to have a lock, I would probably just use a simple sliding lock attached to the door and then a latch attached to the frame. Here is one other option, although it’s kind of pricey.
Real Carriage Teardrop Privacy Lock
Hope this is helpful and good luck!
Thank you so much for posting this! We are getting ready to install barn doors in our basement and your tutorial is perfect! Now I’m heading over to see how you made your barn door 🙂
Great, Lani, so glad the tutorial will be helpful to you. Good luck and feel free to email me any questions.
I’m confused and wanting to know if you have to buy the door to go with it or does it all come together?
Thanks for the great information in this post. Love your doors and I ordered the hardware. I was looking for a way to hang my door that did not cost a small fortune.
Can I ask you about the stainless steel barn door. If we put one in does it close so you could use it as a bathroom door? I mean would there be plenty of closure for privacy.
Heidi,
That all depends on how big you make your door. We had to make the doors for our closets a little small because of the lack of space to the right. So if we close those it’s not very “private” but it’s just a closet and we keep them open for the most part. The door we made overhang the trim an inch on both sides. In hindsight, I would have covered the trim completely. It is still very private. The door is pretty heavy and there’s no gaps. I would just cover the trim for esthetic purposes from the front side. FYI, the reason we didn’t make it cover the trim is because at the time we didn’t know how sturdy the hardware would be and it is rock solid! No worries about the weight of the door.
I really like this project since my wife keeps telling me put up a barn door, but where do I purchase the get hardware?
Great article and we plan on installing a barn door for our bathroom. The link to how you coutersunk the door pull was inoperative a and I will need that kind of info for my project.
Thanks
Hmmm, Chris. I seems to be working now. There was something kind of off yesterday with the blog.
Thanks for the link! Just a note for some… please just be aware,if you have little ones, the safety pin below the wheels on this brand will not prevent the door from falling off of the rod.
Mindy, Hmmmm. I think we haven’t had an issue because our doors are very, very heavy. One time, soon after we installed them, our 70 lb dog tried to push it open and it barely moved. The unexpected response of the door, not opening, scared him enough though that he hasn’t touched it again. I would recommend installing a lock so that if it is closed that it can’t be moved.
Did you use the same size rail for your bathroom door as well? all the rails I see are minimum 6 foot, would like a smaller rail for a smaller door to use on (again) smaller closets.
thanks
Rob,
Yes, we did use the same rail for the smaller doors. We just used a metal cutting blade on our miter saw. I do think that is necessary because I can’t cutting it any other way. The pipe is very thick and sturdy.
For our smaller door opening we made it about twice the width of the door opening.
Hope that helps! Thanks for reading and good luck. We really do love ours. They have been game changers for our space!!
You are an answered prayer, although my door is hardly modern. My house is over 100 years old and I happened to have an extra 5 panel door (to replace a bathroom door that had a plain wood panel poorly replacing the fancier one). The door enters into a bathroom already begging for space with an oversize vanity & reversing would interfere with a closet door, but there is the perfect amount of room for it slide along a dresser in the bedroom. Can’t wait for payday so I can order the hardware–I’ve been planning to redecorate both the bath & bedroom this fall so the post on the Snug couldn’t have been more timely.
So glad you found the post to be helpful and informative. Please visit the site again when you are ready to go! (If you purchase the hardware after visiting my site, I get a very small commission which I greatly appreciate. (Although the tag expires after 24 hours.)
Let me know if you have any more questions.
I built the door, now I am ready to hang it using the hardware. The door is VERY heavy. The kit came with some metal inserts you pound into your drilled holes in the door, then some machine screws that screw into those, but they are not very long.
Did you use the screws that the kit came with for attaching the rollers? If not, what did you use?
Tim, I responded to you via email, but I’ll add it here for reference.
We used the screws that came with the kit. The insert should be threaded, making a very strong connection. We also put wood glue in the holes made for the insert.
Let me know if you have anymore questions.
Good luck!
Thank you so much!! You have inspired me. I’m going to give it a shot.
Sonya,Don’t hesitate to email me questions if you don’t find the answer in the series of posts. You can do it!
hello leslie, thank you so much for your thorough post and link to this hardware. i am considering using the hardware to mount two slim mirrors in front of an existing bathroom window, i would purchase two sets to have 4 wheels total (2 on each mirror), i am wondering if this will work as the mirrors will be significantly lighter than doors and may want to come off bar? i would also need to cut the bar down and am wondering if “end caps” are included. thank you again!
Cary,
This sounds like such a clever way to cover a window. 🙂
Here are my thoughts. I would recommend mounting the mirrors to plywood for 2 reasons. You will need some way to attach the hardware at the top and it will give the mirrors more weight. Unless of course there is plenty of wood to attach the hardware to the mirror.
I honestly don’t see how the wheels can come off of the rail. And in your case with it not being a pass through, I wouldn’t be concened with that unless they were just oo light. We’ve tested it by pushing the door from the inside and it would take some extreme force to get ours off, but they are heavy so I think weight is important.
In all sincerity, it may not be the look you want but I also might recommend using the front mounting hardware. If the weight is not centered with the top mounting hardware like we used, my guess is it will want to lean forward or you just may not be able to get the weight centered.
Lastly, we cut the rods with a metal blade in our miter saw for our closet doors which are smaller and just replaced the end caps that what was provided.
Hope this helps!
Love this! Can I ask where you got the handle?
Betty. thank you!!
We ordered it from Amazon. Here’s a link. http://amzn.to/1MmbG7S
These look awesome. I was looking at the same hardware, and we were going to buy a premade sale door to use. We also plan to use on our master bathroom to create more wall space for a dresser. Our room is tiny and the bathroom used to be a closet so the door opens out.
How far off the wall does the door hang.? I’d love to be able to keep my door trim which just about 3/4 of an inch.
Jackie, If I remember correctly my trim is about 3/4 of an inch as well. I think I say so in one of the comments. I’ll go check and if that is not correct I’ll report back. Just be sure to order the hardware that is top mounted. The front mounted hardware will not leave room for the trim.
Hi there! Where did you get that specific door in your picture? I am wanting to get the barn door, but also swap out my interior doors for that design but can’t find it at Home Depot or Lowes… any advice?
Thanks!
We build those doors! You can find the tutorial and plans to build your own here.
https://deeplysouthernhome.com/2015/02/build-it-contemporary-4-panel-barn-door-for-50.html
Best of luck Adam!
I made this door over the holidays, with some modifications. I was replacing a pre-existing door between a living room and a den, and the old door jamb wasn’t in great shape. Instead of wood, I covered the inside of the door jamb with dry wall. I did replace the old trim around the door.
I did use the door guide. They’re not meant for the door to go through the two “stem” and in this case, also not to go through a trough in the bottom of the door (as in a T guide). They are supposed to go *behind* the door (in between the wall and the door), right at the edge of the door where the door slides past. The door is heavy, and at the bottom leaned slightly toward the door, causing it to scrape the trim.
I have laminate flooring, and the guide would be half on top of the laminate, and the other half would be off. So, I used a Dremel rotary tool to cut off a small piece of laminate to make room for the guide. It was just a bit short too, so I used a plastic strip underneath it (the strip came with the laminate molding for the threshold) and screwed the guide on top of the plastic into in the concrete with Tapcon screws. Now it keeps the door from scraping against the trim.
If you’d like, I can send you a picture of how it turned out.
Leslie
I do not like the sketch type of instructions. Your example did it for me by being very clear on the install. You did answer questions like remove trim, cut down rod. I did have to go buy metric tape and bits. Thank You Jack
This is a FANTASTIC post. Thank you for your attention to detail. Your directons are excellent, your site is so well laid out, AND it doesn’t bog down my computer to come here (not too many ads). Love it! I’m following you now. 🙂
Why, thank you Kim! Happy to have you along on this creative journey! I hope you continue to be inspired in your own DIY’s!
Did you use the three plastic washers that came with the 5 brackets? I assumed they were to keep the bar far enough off the wall so the door can ride over the trim? I did just that when I installed my brakes and hung the bar but I have yet to hang the door so I was wondering if I did that correctly…thanks, very helpful post especially since my hardware arrived with NO directions! Thanks
Bill,
We did use the washers in between the metal circle brackets and the wall. We only used one each. I think they are meant to keep the metal from indenting the wall, or like you said, give you extra space between the door and the trim.Hope this helps.
Oh, man, that stinks you didn’t get directions, but really they aren’t much help. I think we pretty well covered it in this post. Let me know if you have any more questions.
I can’t find the link to the hardware website. I must be missing it. Would you please post it again?
Did you mount the hanger hardware centered along the top of the door? I need about an inch of space to clear the flat door trim and was hoping I could pick up a little more room by offsetting the hanger hardware a bit. I love the idea & its just the solution to an awkward bathroom entrance next to the toilet room.
Thanks
Thomas, I sent you a direct email, but no it’s not centered over the door to allow room for the door to slide completely out of the way.
You provided my and eye some excellent information for our bathroom remodel! I am a nearly %100 DAV and the VA helped with redoing my master bath to meet ADA standards. One of the requirements was that we had to have at least a 36″ door that swung out. This idea was hideous to me and the home inspector suggested a pocket door – again, not my idea of nice. Then out of the blue my wife found your web-site and for the first time, we heard about interior “barn doors” – for us, the perfect solution. The bathroom is not quite finished but the decision has been made – your beautiful barn door! Thank you for all the wonderful information and yes, I will click and order from those you have recommended.
Thank you!! 🙂
…..Pete and Tammy
“You provided my and eye” was “You provided my and wife and I” – not sure what happened.
Peter,
Thank you for your service. I am so happy my awkward door situation and solution is helpful to so many people! I feel certain it will work great for you too.
Thank you for sharing. I’ve been in the process of remodeling the retirement house of my parents which was left to me. With a limited budget this idea is great for the newly remodeled en suite bath. It eliminates the awkward door next to the shower or vanity issue. I will take pictures and let you know of my progress.
Thank you again.
Pam S.
Fantastic! I can’t wait to see your door. I know you will love it.
Hello! I bought the hardware a while back and have misplaced the instructions. You don’t happen to still have your you send me a picture of. I have looked online but to no avail. Thank you! Love what y’all did!
Cheryl,
Unfortunately I do not have a copy of the instructions. But honestly, I think my points are probably more helpful as there were no written directions only diagrams. I bet if you read through all of the barn doors post you would have enough information to do it well. Let me know if you have any specific questions. Thanks and good luck! And enjoy your new door!
Hi! I’m giving this a shot in the next two weeks…thanks for the plans, few questions.
1. The back side of the door was left completely flat right? Only the front has the four panels.
2. How do you keep the door from tipping over? Do you have a track at the bottom? I looks from the pictures that you could push the door from the inside out. I have young kids, looking for a solution to keep it in place at all times.
3. How long did it take you to put together.
4. FINALLY my last question, sorry for so many, do you know if Home Depot will do all the cuts ?
1. Yes, the door was left flat. Leaving it flat allows the door to function without touching the existing molding. This should be standard unless you have especially thick molding.
2. We didn’t have too many issues, but the hardware comes with a guide that actually gets attached to the bottom of the door. We just chose not to use it. Once our dog pushed it open in a panic but the door did not come off the track at the top. I would recommend securing it for small children.
3. With the plans it shouldn’t take long at all. We had the door built in an afternoon and that was with trying to figure it out as we went. You’ll have the benefit of it all pretty much spelled out for you. 😉
4. Absolutely, Home Depot will make the cuts for you. I would just recommend not going to get the cuts during the busiest times. Although, from experience if you go on really off house you’ll likely need to track someone down to make the cuts for you.
WOW – You inspired me so I made my own barn door from a basic $36 hollow-core wood door from my home center. My opening (between Family Room and Bath hall) was about 36″ so to frame the door and provide coverage around the opening, I added flat, shaker-style trim to the door, leaving about 1.5 inches extending around the door. I gray-washed the wood door (to give the wood a richer look) and screwed on the trim. At the top the extended trim covered part of the wheels to give it a clean look. Then, I re-purposed one of the rubber floor glides on a one-inch L-bracket and attached it to the baseboard so it didn’t rub.
Love these DIY projects, so thanks for showing me the way.
Happy to send you a photo via email.
Great work! What about privacy around the edge? We are thinking about using this door for a guest bedroom, but we want to make sure this door gives them enough privacy.
Jason, As long as you build the door to completely cover the door casing (frame around the door) it is very private. I plan to build a new door for a guest bedroom in our “new” house.
Thank you so much for posting how you assembled the hardware! Of course it took me some time but eventually I figured most of it out except the last step! For the life of me I couldn’t figure out what that piece was for! And now it makes sense that it just guides the door! Wish they made instructions with words and not only pictures! Thanks again!
I’m glad it was helpful to you! I figured if I was going to endorse the hardware I ought to at least offer some help with the installation. Because you are right, those directions left a lot to be desired.
Is there anything or anyway to convert this to use on a kitchen cabinet/cupboard door. A much smaller door. Any thoughts welcome!
We love your blog and would love to order the hardware. Can you tell me the link to it please? I didn’t see it on the blog.
Hi,
Your photo of this gorgeous door & hardware is everywhere! I enjoyed reading your tutorial (when I could dodge the popup ads 😉 but was disappointed to find that the affiliate links to your hardware sources are missing…please re-post if possible!
They seem to be working now. Thanks for letting me know.
Sorry about the ads. I plan to reduce the number of ads after the first quarter. Ad revenue is part of the way I support my family and the blog.
Hi! I’ve started this project and I’m stuck! I can’t figure out how to attach the gliders to the top of the door. I feel ridiculous, but how in the heck are the metal anchors supposed to get into the top of the door? Are you supposed to use the allen wrench? I’m reaching peak frustration. Thank you for any assistance!
Heather, I’ve responded to you directly. Let me know how it works out.
Thank you for these tips! My husband is an instructional designer and when he saw the included “instructions”, he laughed. We appreciate you taking the time to save us time!
Kate,
Clearly they need to hire him! You are very welcome!
It felt wrong to not share what we learned if we were going to recommend the product.
Thanks for letting me know it helped. I appreciate it!
Leslie
Your doors are beautiful!!! Just what I was looking for!!! Thank you for sharing your step by step easy to follow instructions and pictures. I just ordered the hardware through your link. Thanks for your help, Leslie!
Awesome! I know you are going to love the doors. Feel free to email me any other questions and I’ll do my best to answer.
I do have a question about the size drill bit you used for drilling in top of door?
We used the same size bit that corresponds with the brass inserts.
We discovered that if you went in with a drill bit the size needed for the screw, the drill tended to hop around. In order to keep the hole straight and level, we incrementally increased the diameter of the drill bit.
The size of the brass inserts were determined by the size of the screw that came with the hardware.
Hope this helps!
Leslie
I sent you s direct reply.
Hi Leslie – Thank you so much for your tutorial. It has helped tremendously. I’m about to install the metal brackets in the top of my door and wanted to see if you could let me know the final size of drill bit you used for the metal inserts?
Thank you!!
Jamie,
I am so happy this tutorial has been helpful. I wish I could tell you an exact size for the drill bit, but I am certain it directly correlated to the size of the metal insert. Which of course correlated to the size of the bolt. I am almost certain it was the same size or very close. To install the inserts, it is best to use a large flat head screwdriver or we actually have best results using a medium head chisel. If you put too much pressure on the insert they can break.
I’m sorry I couldn’t answer your question specifically, but hopefully this helps! Don’t hesitate to follow up with more questions.
I will be putting this dazinzlg insight to good use in no time.
awesome. bought the same hardware (TMS) for an 8′ rail. but it did not come the instructions yours did! tried to locate them on the webs which is how i found you. would you happen to have a pdf to share? 🙂
thank you!
I know this article is over 2 years old now, but I wanted to let you know how much I have appreciated it and the others related to it. After much reading and contemplation, I ordered the similar door set for larger, heavier doors. The one that I got has the bolts that go through the door instead of attaching to the top of it. I devoured your tips and photos to help get everything just right. It turned out amazing! I love it. Thanks again for the terrific articles.
Great post, great instructions, and great hardware! Took a couple days including sanding, and painting, but looks amazing. And you don’t really need a metric tape measure, you can just measure the height of the bracket and hang the rod based on that. Very easy install, and even easier with this article! Thanks
I am so happy the instructions were helpful! We loved them so much!
That little spacer needs to be screw to the floor with the long side along the wall between door and the wall to prevent the door hitting the wall. Hope this helps with the confusion, it took me a while to figure this out with no help from the instructions that comes with the rail, haha
best barn door hardware
http://muller-designs.com/product/handmade-sliding-barn-door-hardware/
Give an authentic finish to your barn doors with our Industrial Barn Door Hardware. All barn door hardware made with environmentally friendly materials.
Looking for unique barn door hardware designs for your home décor? Get in touch with Muller Design which is the eco-friendly atelier in Los Angeles.
This is amazing! I am planning for a DIY barn door for our master bedroom too. This is going to be so helpful. Thank you so much! Love your style and DIY projects 🙂
Thank you! I am so happy to hear this will help you! That’s why I do this!!
Very Informative. Thanks for sharing. Keep Posting 🙂
Leslie. Excellent post. I have now built two of these doors! Thank you. I am mounting the exact hardware that you used and have a question.
What spacing did you use for the rollers on top of the door? The instructions put the rollers very close to the edge and centered in the thickness of the door- and then offset further down the page. I too have left 9/16” casings in place, but my door is 1 3/4” thick, due to added shiplap on interior side.
Do you know the offset for the rollers from the ‘rod side’ of the door?
Thanks!
Sorry it took me a while to respond. Not on this door, but on others we have added heavy duty washers. Hope that helps.
Hi, I came across your post today and noticed your wall color. It is the same color we have been searching for. Do you happen to know the name of it by chance?
Thank you !
Mary