Build a Rustic Sofa Table & Make New Wood Look Old
And How to Make New Wood Look Old
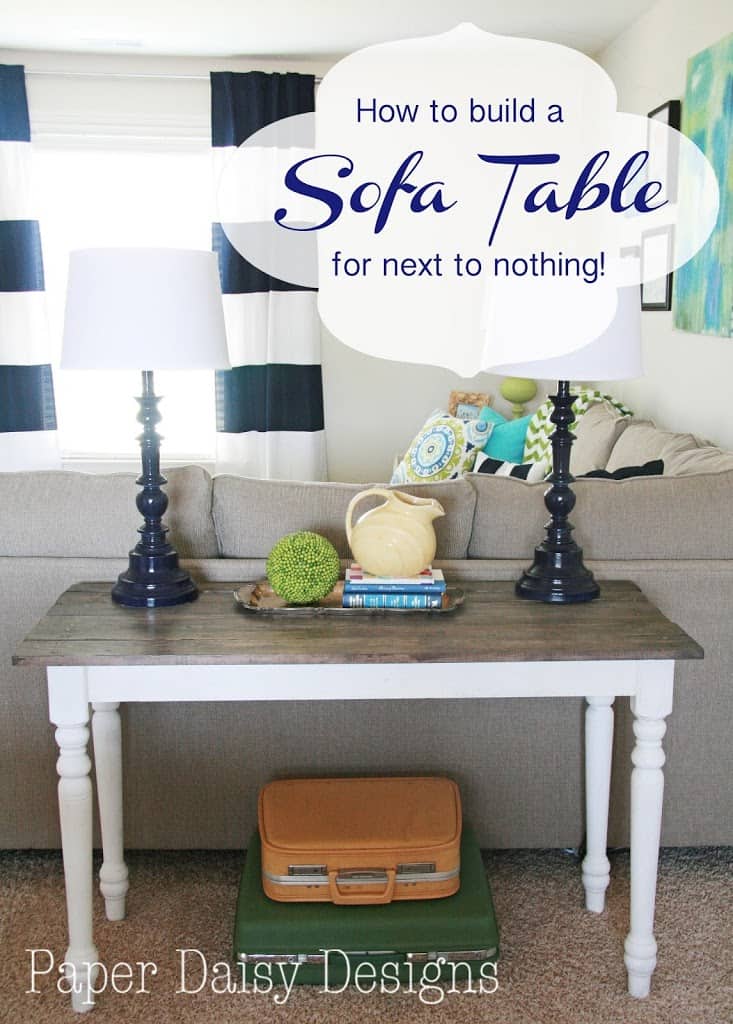
I think one of the projects I am most proud of in our Media Room Makeover, is the sofa table my husband helped me build. Well, he built it and I just assisted and supervised. I love everything about the table.

I didn’t think it would be that hard to find a sofa table for the room, but honestly I came up pretty empty handed in my shopping at thrift stores, scouring Craig’s List and garage sales.
Eventually, I started looking for kitchen tables we could cut down and make into a sofa table. No luck there either. I was lamenting to a friend, who came to see the progress of the room, that I was having trouble finding something to use as a sofa table.
I said to her, “If only I had some table legs, I could just build what I want.”
Then it hit me… It was one of those moments of clarity. Do you know the kind of moment where the light bulb flashes above your head and you can almost hear a coordinating “ding, ding, ding” going off like you’ve won a grand prize? Because as soon as I said those words, I turned around in my studio, opened the door that leads to the attic and right there leaning in the doorway, were 4 table legs that used to belong to my craft table.

The tabletop is still being used in my studio, but the legs were discarded and stored in this attic space when I didn’t need them anymore. Like any good hoarder, I just tucked them away in the attic for a purpose yet to be determined. The problem is I forgot I had them.
You ask, Seriously?
Seriously. About 3 years had passed probably, but still, I walked right by them every time I went into the attic. Anyway, with that most amazing discovery, I started laughing and jumping around with glee, kind of like a kid getting a new bike at Christmas. My friend was not as impressed. In fact, she was probably freaked out and thinks I belong on that hoarder show for not knowing I had the very thing I said I so desperately needed.
So, now that you’ve got that colorful story, onto the building of a sofa table that cost me less than $40 to build. All we purchased were a few pieces of wood. You might have pieces laying around in your attic or garage, you never know. 😉
(This post contains affiliate links for your convenience.)
How to Make New Wood Look Old
I started with some 1″x 4″ s and cut them down to 4-foot lengths.
I wanted them to look very old, rustic barn wood like, or maybe kind of like railroad ties. Something old. I started by distressing them.

I used hammers, nails, a crowbar, anything I could get my hands on to beat it up with. That was fun.
[adinserter name=”Old wood post”]
This step is important for the wood to look authentically old and worn: I used a blade/knife to scrape off the straight corners or edges of the wood and sanded all the previous distressing lightly so that the distressing didn’t look new.
After I felt like they were sufficiently distressed, I began staining the wood. I used a mix of Minwax Dark Walnut Stain and my absolute favorite stain color, Kona Wood Stain, by Rustoleum. (I do not know the exact ratio, I just mixed them together until I created a color I liked. I would suggest mixing the two stains together in about even proportions and test on a scrap piece of wood and adjusting the quantities until you are happy with the overall tone.)

After it dried, I sanded it down a little and applied a wash of watered down Paris Grey, Annie Sloan Chalk Paint. (Again, I just organically mixed them together, maybe about 2 tablespoons of paint to 1/4 cup of water.)

I thought this looked pretty weathered. I was giddy. 🙂 You can see that the wood looks rather grey here. Once I added the finish, it warmed back up a bit. If you want it greyer, then consider doing a second coat of wash.
To protect the wood, I finished the wood with Minwax Wipe -On Poly, Satin.
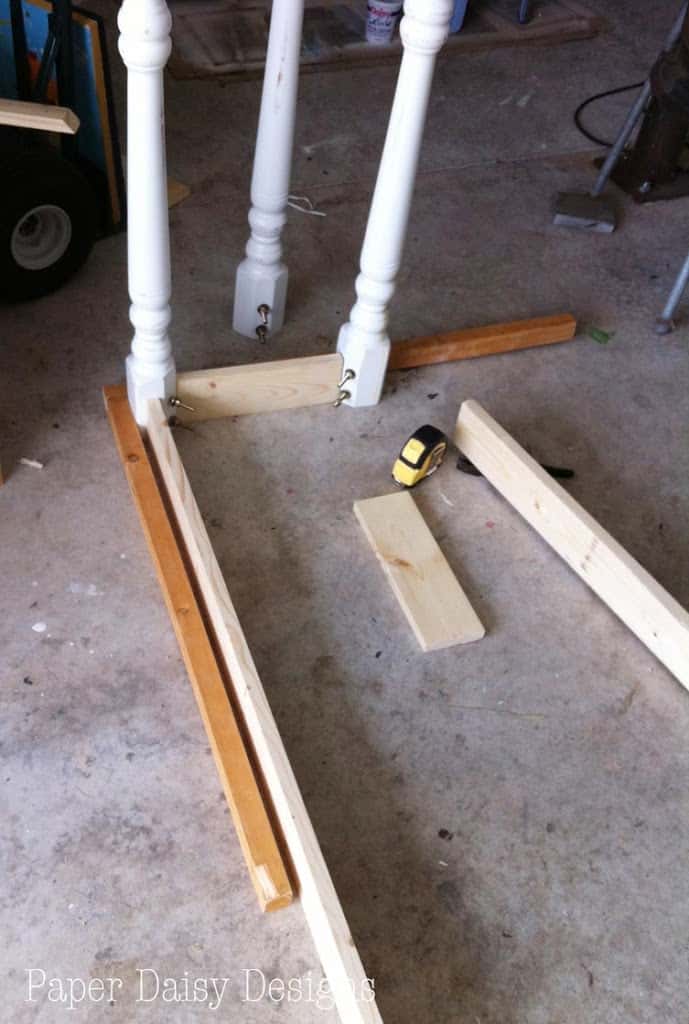
How To build a Sofa Table with existing legs.
While I was doing all of this, my husband was working on building the frame for the table top. I must tell you while he is a fantastic husband and provider, he is not at all a carpenter. He knew going in that I did not expect this to be perfect. It was just supposed to be functional. And it is.
I’ve seen lots of DIY furniture in which people use a clever gadget, called a Kreg Jig. (affiliate link). I’m sure that tool is totally worth it, but we don’t do enough of this type of thing to justify buying one. We just kind of winged it using the original table as a guide.
Update: As of Fall 2014, we now own a Kreg Jig and love it. It would be a great tool for this type building project, but for this table, we already had legs with bolts in them an worked off of what we had. We have used the Kreg Jig in our DIY Kitchen Island Cart and find we use it now for so many projects. Visit affiliate link above for more info.
Basically, we copied the apron base of the table from which the legs were originally attached to, adjusting the measurements for the new table size we were building, a 3 foot by 4-foot sofa table.
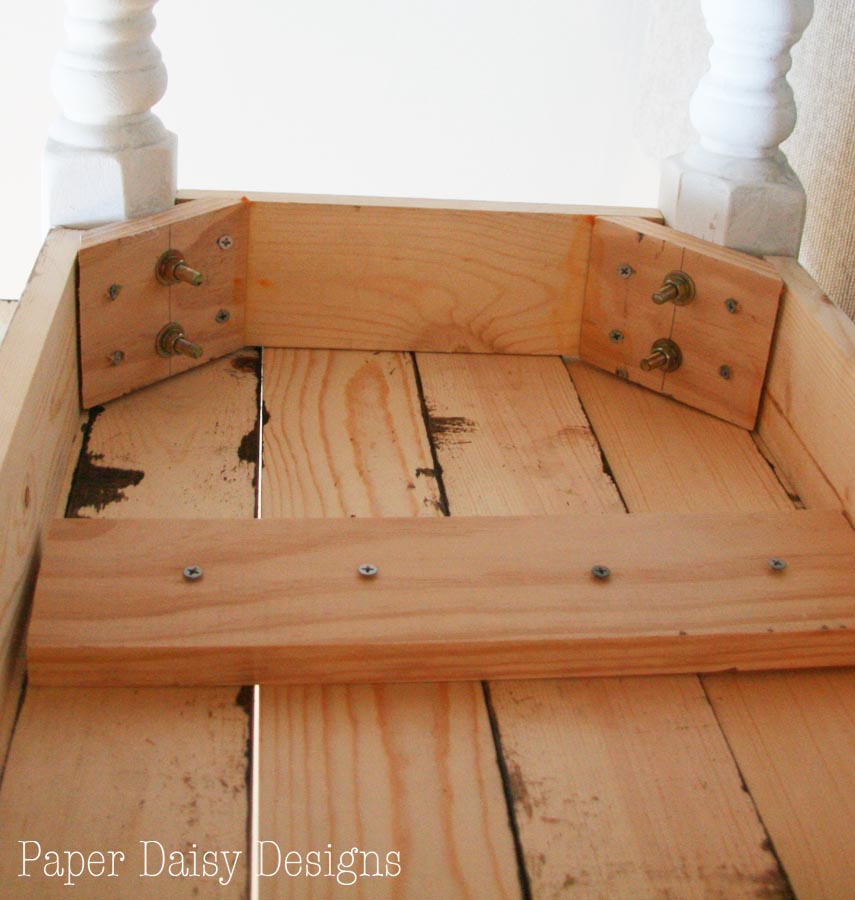
As you can see, the four side boards met with the table legs with an angled piece forming a triangle in the corner, which was used to screw it all together. We also used the existing bolts coming out of the legs.
In the middle, for extra support, the boards were secured with two strips of wood.
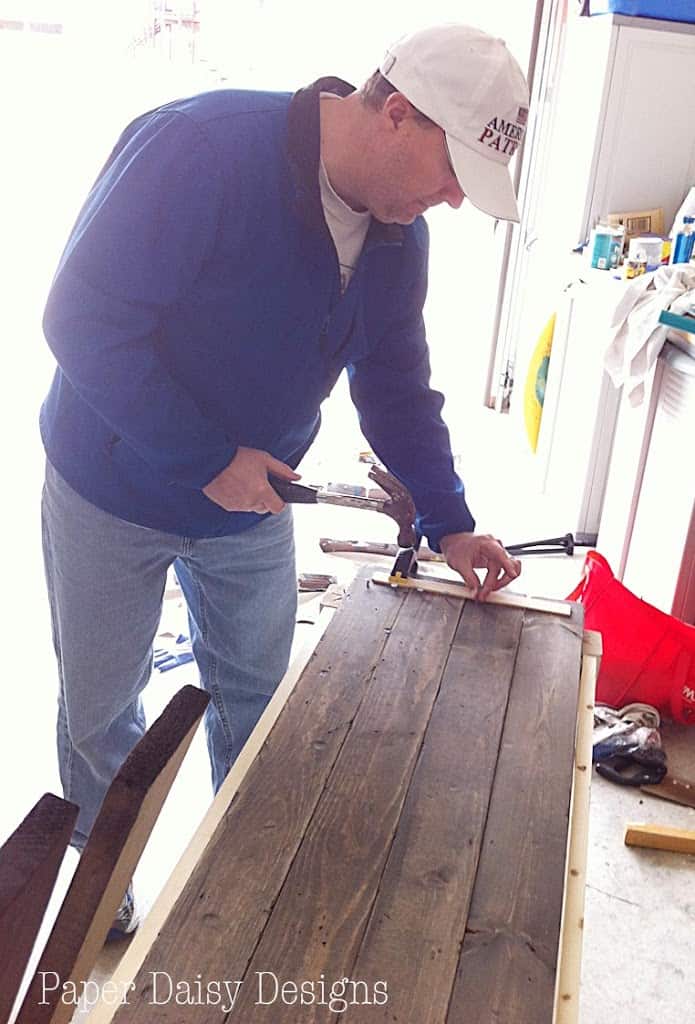
The nails along the top were both functional and decorative. The nails went into the frame to secure them to the table. The last nail on the end hung out over the frame, so we cut it off underneath and covered it with silicone to keep it from snagging on anything.

I rubbed the stain on the nails with a Q-tip once they were nailed in place. They look nice and rusty now.

I painted “the box” or table runners, white to match the legs and then did a wash of Paris Grey and Old White ASCP to age it a little. I then finished it off with Johnson’s Paste Wax. I just kind of slopped it on to give it a texture, to mimic many layers of paint
Because we built it to suit, it is the perfect size for the back of the sectional. And while I don’t think it would win any woodworking skills awards, it is perfect for the space.

And I love it. I’m one lucky lady to have a hubby that’s willing to help me in any way he can with my decorating endeavors!
I hope you are inspired to see what you can build. As I said, mad woodworking skills are not required, all you need is the desire and a willingness to try.
Here’s another great finish to try. This technique is a perfect knock-off of Restoration Hardware’s Salvaged Brown finish. Transforms the cheapest woods into a high end salvaged finish. Click here for the tutorial.

If you like this building project, you also might want to check out the tutorial and complete building plans for Kitchen Island Cart.

Thanks for stopping by! Feel free to share on your favorite social media! And check out my other thrifty DIY projects.


This looks great! You've made me think "Maybe I CAN do that!"
I need a narrow sofa table just like this, and you reminded me I have 4 table legs! Just FYI, I don't have the famous jig, I have one that cost less than half and does work pretty well (it was maybe $30 at HD). But I think your solution is just fine – I mean, who looks under the table anyway, lol?<br /><br />Thanks for sharing it … now to see if I have some 1×4's that I forgot about
Ok, I know this is an old post but I’m hoping you will answer. I would love to rip out my living room and dining room carpet and put in a wood floor. We live on a slab so I’m guessing I would have to put down a sub floor. Do you think I could do something like this for a floor? I don’t want to spend a fortune on having someone install a typical wood floor and want this barn wood look. I am pretty handy and would be doing it myself. (Love my dear husband of 34 years but he’s not at all handy, nor is he willing to learn. *please note: he does have other wonderful redeeming qualities. ?). Anyway, do you think it would work? It’s a low traffic area.
Thanks!
Sandy
Sorry it took me a bit to respond. I think you can totally do this finish on a floor with a durable top coat. I have seen people do plank floors with just regular lumber, but I haven’t done anything like that, yet! Hope this helps!
Your sofa table looks amazing! I really like the contrasting colours and textures between the top and the legs.
It's beautiful – and looks perfect for your space! Visiting from Redoux Interiors.
Oh Leslie, I absolutely LOVE it!! I was hoping you'd post your tutorial on this sooner rather than later. THIS was the one I really wanted to see. Bravo for you! The wood really does look weathered. I think your slicing the edges of the wood with a knife is what convinced me that it truly was found wood. Great job!!<br /><br />Debbie
Thanks for the inspiration. Great Job! New Follower.<br /><br />Jody
Ah yes…..I remember your "light bulb" moment and how excited you were about having discovered the table legs! You were too funny! It turned out really great as always.
Wow! That turned out so nice. And to think you had those legs just waiting in the wings for the perfect project! That does sound as good as a new bike on Christmas. Hats off to your husband too. Visiting from MMS.<br />
When I arrived here from H of H I realized I had been to this room before… And I love it!! The table is fabulous! Great job and tutorial!! Thanks for sharing it:)<br />Krista
thanks for giving me a good idea.I want to make a coffee table with old wood but the recycled wood turned out to be ten times the price of new wood which rather defeats the purpose..I'll give your idea a try.
Wow, so impressive. I have to give this a try now that I know it can be so easy! Thanks for sharing :)<br /><br />Crystal <br />www.myelementstoelegance.com
I love this table even more that you made it! It's great!<br /><br />Mandy @ The Hankful House
What a beautiful space and table! Love your lamps! I would love for you to come link up to my party and follow along! http://alivedinhome.blogspot.com/2013/04/get-social-sunday_28.html
Hi! You were the link before me at the Nifty Thrifty Tuesday link party! I love your DIY sofa table and will be pinning for future reference! <br /><br />I also love the photo of you in your about area! What a cute setup and outfit you chose! {I am working on my "blogger headshots" as we speak so it's something I notice recently!) :-)<br /><br />Thanks for sharing!<br /><br />Cheers
Hi there!! I just wanted to let you know that I nominated your blog for the Leibster Award! You can read the post here. <br /> http://furniture-ology.blogspot.com/2013/04/weve-been-given-leibster-award.html<br /><br />We are also new followers of yours. Follow back if you'd like :)<br />Steve & Meg @ {Furniture-Ology}<br />
GORGEOUS!!! I so want to try something similar, for a coffee table! THanks for the inspiration!!<br /><br />ps- cute cute dog, and love the wall art too!
Awesome job! Way to reuse and make something so beautiful and useful! Love it.
This is so awesome! I love the whole room. Thanks for sharing the tutorial. You guys did a great job.<br /><br />Stephanie @ thestyledsoul.com
great job, and i LOVE the colors in here!
This is so awesome! I love it! I just wanted to let you know that I'm nominating you for the Liebster Award. Go check out my blog at http://www.theprincessandhercowboys.com to get all the info and I'm excited to see all your amazing talents!
That really looks amazing. I love how you distressed the top. Very professional looking. I would love for you to come and link this up to my Swing into Spring party. http://diybydesign.blogspot.com
Leslie ~ What a great tutorial… I totally want to make one! I'm featuring it at the PoPP Spotlight this week. Thanks for linking up.
Congratulations! You've been featured on this week's Martha Mondays! 🙂 Swing by to pick up a "Featured" button and do a little bragging! :)<br /><br />http://www.watchoutmartha.net/2013/05/martha-mondays-link-up-party-features.html<br /><br />Amanda<br />www.watchoutmartha.net<br />
Congratulations! You've been featured on this week's Martha Mondays! 🙂 Swing by to pick up a "Featured" button and do a little bragging! :)<br /><br />http://www.watchoutmartha.net/2013/05/martha-mondays-link-up-party-features.html<br /><br />Amanda<br />www.watchoutmartha.net<br />
I LOVE the stain that you used! I have been trying to find a stain that looks like this for a headboard that a friend of mine built. You said that you used a mix of Minwax Dark Walnut and Rustoleum Kona. How exactly did you do that? Like literally mix the two? Or just a combination of both? I would love to recreate this look!!
Charis,<br />I did literally mix the two colors together in a jar. I can't remember why exactly I did that. I think it made a truer old wood color? Or in all honesty, it could have been I was almost out of one or the other. Either way, I think it's a great mix for this application.<br /><br />Hope this helps and thanks for your comment! As always, I'll send this to your email as
I've been wanting to find one already made or make one myself to use in my home office, instead of the small computer desk I now have. I saw an idea in a magazine and also on Pinterest and I have that picture taped up on closet door. I wanted to have room for my desk top computer plus my printer on it. My printer is currently sitting on bottom shelf of existing desk and to change ink
My best advice is to go to a hardware store and ask for suggestions, but I bet a drawer slide used for cabinets would be your best bet. I have a keyboard tray on my desk and from what I can see the mechanism closely resembles a drawer slide. I think you would just attach it to a shelf and would be good to go.<br /><br />Hope this helps!
this is so funny! I am glad to see I am not the only one who saves table legs. I have a set as well, and I could really use a table in my hallway. The one I have now is an antique, and while beautiful, does not really go with the rest of my decor. It also has a lower shelf, so it is hard to sweep all the dog hair out from under it! I am really hoping to try this now that the weather is
Great job on distressing that wood and re-using those legs! I reproduce antiques (french-canadian inspired rural furniture) and i'm impressed! That table woud sell upwards 500$ in my shop. Next time, if i may suggest, stain the other side of the wood too. No need to distress it, but it does make a better finish and looks more professional.
I agree. And spend a couple of bucks and buy cut nails if they are going to show on a piece you’re trying to “age”. Looks good though.
When you say you used a "mix" of the two stains, did you literally mix them together or did you do one and then the other?
Yes, I do indeed mean I mixed the stains together in the can that was almost empty.
Thank you so much for this! You've inspired me to try this on an antique trunk I wanted in a darker shade of brown. So far I've applied the first coat of kona by rustoleum. If turned out much darker than your photo after stain. I will try sanding it down some and see if that helps.I will Aldo be using the chalk paint wash but I am stuck on how you sealed everything. Did you use
Diana,<br />I'm so glad you've been inspired! That makes my day!<br /><br />Your trunk probably came out darker because your wood was likely not pine as my boards were. If I remember correctly, that photo of the wood before the wash was in bright light. Also, I mixed Kona with another color. <br /><br />Not to worry though, the wash can just be applied more than once to get the final
Is there any chance you can give me a rough estimate of the stain ratio? I have *never* done anything like this before – my husband built me a simple desk that I found on Pinterest, but I am finishing it and am nervous! Thanks so much for any help you can give – beautiful blog!
Laurie,<br />First of all, take a deep breath and relax. 🙂 It's very unlikely that you'll mess it up, although I do understand your fears. First time staining a piece can be very intimidating.<br /><br />To answer your question about the exact ratio of the stains, honestly I can't remember with complete accuracy, but looking at the finish I'd guess it was around half and half,
Thanks so much for the quick reply! I bought the stain this afternoon and will start tomorrow. 🙂
So are the legs only screwed into the piece that forms the triangle? Or are they also screwed into the side pieces?<br /><br />Trying to figure out how you attached the side pieces without a jig (I don't have one either). Love this table. Thinking of doing something like it:)<br /><br />Great job!��
Anonymous: Yes, at this time we didn't own a jig and the legs were recycled from another table so we just screwed the legs into the triangle piece with the bolts and screws already attached to the legs. We also then secured them with addtional screws shown in the photo.<br /><br />Now, we own a jig and they are pretty sweet. That's how I'd do it now if I did it again.
I absolutely love your sofa table! My husband and I are currently working on getting this look for our new dining room table, which is just made out of pine 2x4s from Home Depot. I'm wondering how you mixed the Dark Walnut and Kona stains for your boards? Was it an even mix, did you apply one first and then the other? What was your technique? It looks fabulous!
Laura,<br />Thank you and I’m so glad it has inspired you!<br /><br />To answer your question about the exact ratio of the stains, honestly I can't remember with complete accuracy, but looking at the finish I'd guess it was around half and half mixed together in the can and applied only once. There might have been a little more of the dark walnut than the Kona. <br /><br />My best
did you mix the stains, or apply over each other? if mixed was it a 1 to 1 ratio?
Leslie, <br />My husband and I are refinishing a desk and I'm thinking about using these ideas. I'm curious about the paint after the stain technique. Does the paint cover up the stain at all or are you using such a minimal amount that it just tints the stain? Any info on the paint after stain technique would be great. Thanks!
Hector, I can't remember the exact ratio. If I had to guess it was close, but not quite 2:1. Two parts dark walnut, one part Kona. You could always use a scrap of wood to test your stain mix. I would just mix it in a small jar, even a baby food jar you won't need much for a table top. Hope this helps!
Anonymous,<br />The paint used after is more of a wash, so that the paint is very watered down and the stain shows through. I applied the wash with a rag. Wipe some on and then if you feel like it's too much you can wipe it off. I honestly don't think there's a wrong way to do this. It's just a matter of personal preference.<br /><br />Good luck!
Do you have any idea what type of wood you used? Pine? Or something harder? Alder? <br />
What ratio did you use for the wash?
I used simple pine boards and the ratio, If I had to guess it was close, but not quite 2:1. Two parts dark walnut, one part Kona. You could always use a scrap of wood to test your stain mix. I would just mix it in a small jar, even a baby food jar you won’t need much for a table top. Hope this helps!
I love this! What was the water to chalk paint ratio you used for the wash?
I have the same question as the last comment..we have distressed the wood and used your combination of stain (absolutely beautiful!!) And I put the chalk paint on top as thin as I could and it did NOT look the same! I know you said it was a wash..so I watered the chalk paint down, but it just bubbled up on the wood and would stick. Can you help us out with how you did the chalk paint on top Of the stain? How did you water it down? Thanks in advance, your work is beautiful!!
Here are some thoughts. I added water to a plastic cup with maybe a quarter a cup of paint. Maybe a few tablespoons of water, maybe more. I remember it being fairly watery. I used an old t-shirt and rubbed it in. I can’t specifically say that it bubbled, but I remember working it in. If it’s still too light, or not “washed out enough” you can always let it dry and do another coat. Because chalk paint is fairly water soluble if you don’t like it you can always clean it off. (Especially since the stain is resisting it.) I wonder also if you used a different brand of stain? Also, temperature can play havoc on these types of projects. If it’s too cold it could definitely effect the application. Hope this helps! Keep me posted.
Thanks so much for getting back to me!! Can’t wait to try it this weekend!! I didn’t buy the Annie Sloan paint BC it wasn’t sold anywhere near here..so I settled for a brand Michaels had. I will play with it more tomorrow and let you know:)
Oops you asked if I used a diff stain. I actually did buy the same brand and color you suggested, so maybe the off brand of chalk paint is messing it up. We will find out!
That might be the case. Also, I noticed when I re-read the post recently that I said I sanded it lightly after I stained it and before I did the wash. I forgot I had done that!
OK I’ll try that! Also, did you wait until the stain dried or was it still slightly wet when you applied the chalk paint? I noticed this post was from like two years ago and you are still getting comments!! I think you should sell your recipe lol
Katie,
Yes, I let it dry completely. And then I sanded it a little before I applied the chalk paint! Maybe I should do an e-book? No, I just hope people would like it and re-pin or follow me etc. 😉
Hello for the new wood that looks old I wanted to know what the ratio of dark walnut and kona was also what the ratio of the Paris grey and water was? Thanks
To answer your question about the exact ratio of the stains, honestly I can’t remember with complete accuracy, but looking at the finish I’d guess it was around half and half mixed together in the can and applied only once. There might have been a little more of the dark walnut than the Kona, but this is a very forgiving process. Not every piece of barn wood looks exactly the same and neither will these finishes.
As to the Paris Grey ratio, I just filled a small cup with maybe about a 1/4 cup of paint and then added a few tablespoons of water until it was nice and runny.
If you are concerned with the look, try on a scrap piece and play around with the look until you achieve the results you want.
Do you remember if both stains were oil based or water based?
Yes, both were water based, but different brands. The Kona is by Rustoleum and the other was by Minwax.
Hi, I love the table! I have a question for you? Where do you plug the lamps in since they are not near a wall/outlet? I have a sofa table that we are going to make over and I also have this set of lamps I found at Goodwill that I was going to makeover a long time ago but never had a place in mind to put them so I have done anything with them yet. Then I saw you table and I thought hey! I could put those lamps on the sofa table! But then I thought, but where do I plug the lamps in???
Amy, Here’s what I do for just about every table lamp. I find a way to run the cord along the back of the table either with tape or a tack with a rubber band or zip tie holding the cord so you can’t see it. In both my old and “new” house, for that table behind the sofa, I ran a good quality extension cord under the sofa with the light cord running down the back side of one of the legs. Just be sure it’s not being pinched or walked on and you’ll be good to go.
I really appreciate your detailed clear instructions! Your projects are high quality, long lasting and useful. And great looking! Thank you.
What ratio did you use to “water down” the chalk paint? Also… what ratio of Kona to Walnut stain did you use?
Nevermind…. looked through the comments and saw the answer!
You said you mixed the two stains, Minwax and Rustoleum. Did you mix equal parts and stain the table or alternate layering of the two stains individually? I love the look of the two of them combined.
I mixed them in an almost empty container of the Kona by Rustoleum. That’s why I can’t give you exact mix ratio. But, you can always do a test sample on a scrap of wood and adjust accordingly. Good luck! It is a nice combo!
I LOVE this table! I have pinned it to make once we close on our new house but I’m curious as to how tall the legs that came off the old table are? I’m frantically searching for legs to use but there are soooo many sizes to choose from!
I really like the effect of the tabletop that you managed with both those stains.
If it were me, I would have done the bottom as well,
Gorgeousness!!!
Hi, Leslie! Can you please tell me where you got the sofa? I’ve been looking online for days now trying to find it 🙂 Thanks in advance!
Eve,
The sofa was ordered for me directly for me by an interior designer friend about three years ago. I would not recommend it though because it was very cheaply made and will need to be replaced as soon as I can afford to. Good luck on your hunt. I actually have been looking for a similarly sized replacement.
not nothing…good use of grammar…
Dave, I realize I am using poor grammar. I am trying to make light of the fact, that in hindsight, my previous statement, “Build a table for next to nothing” is not exactly true. Please forgive my poor usage.
You could have also tried using a combination of white vinegar and steel wool. If you put the steel wool in the vinegar for a day or 2 and paint it on the wood it will quickly age the wood for you.
Greg, Yes, I know about the vinegar and steel wool technique, but I rather like this better. This technique is a bit more warm in tone and easier to control. I used the vinegar with great success when I refinished our dinning room table. It was a very orange, 90’s mahogany wood and the vinegar worked wonders to counteract that color.
You can see that technique in this post, although it’s not a tutorial. After searching my own blog, it turns out I never did one.
https://deeplysouthernhome.com/2015/04/botanical-easter-tablescape.html
Hi this table is beautiful! Going toGive it a go for a dining table, after staining and chalk paint did you seal it or use some kind of finish? Thanks!
Amy, I used Wipe-On Poly by Minwax in a satin finish. There is a link to the product above. Good luck!!
I know this is an old post, so if you’re still replying to comments…what did you use to finish it? (You made the comment that the boards warmed up after you “finished” it.) Thank you!
Andrea,
I try to be a good blogger and respond to every question regardless of how old the post is. 🙂
I used a wipe on poly by Minwax in a Satin finish. It’s one of my favorites. It is easy to apply and provides a durable finish. I would recommend at least two coats but 3-4 is not a bad idea if this is a surface that will be used everyday like a kitchen table.
This is exactly what I have been looking for; I can’t wait to try it! Your table turned out great!
I am so happy this will be helpful to you!! Good luck!
Great job, you’ve got me thinking now. Only I’d do under the table top as well, just to make it look genuine.
Your work is so full of useful information.