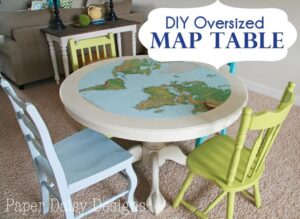
Just a few more makeovers from the Media Room to share. Today, it’s the Map Game Table.
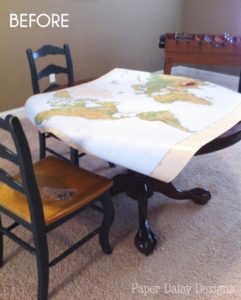
Because it’s always fun to see where you came from. Here’s the ugly table with the map thrown across it.
And while you might be confused by these chairs, which clearly were not intended to be paired with this table, this is not an antique table. I did, however, buy these chairs as part of the “set” off Craig’s List for around $30. I can’t remember exactly, but this seems right because I remember thinking, “I’d pay that for just the chairs!”
What my very cool map is hiding underneath it though, is the bowing and swollen spots in the center of the table. Believe it or not, this table top was actually particle board. I wish I had photos of the damage, because fixing it was interesting.
I ended up sanding the swollen particle board down. It kind of just shredded like cardboard. Once it got it even, I patched it with dry wall spackle. All I wanted was a smooth surface since the top was going to be covered by the map.
It also had a bead trim around edge that was missing in some spots. So that had to come off. I know I took photos of all this but, after looking for quite a while they are not to be found on my computer. GRrr.
I gave the table a couple coats of Annie Sloan Chalk Paint in Old White. I really do love that paint. I know people are into DIY’ing the paint and I did that myself on a few of the chairs. More to come on that later. But I do think Annie’s paint is worth it, if it comes in a color you want for your project.
Then it was onto cutting the map into a very large circle.
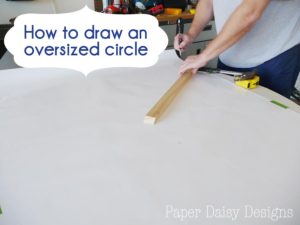
Initially I tried using a pencil and a string to draw a circle. That so did NOT work. The pin I was using for the center kept moving and the tension of the string was inconsistent. Not to mention, the angle of the pencil made a difference too. I kept ending up with a wonky circle. Not what I wanted. I needed a fixed compass.
So here’s what we did.
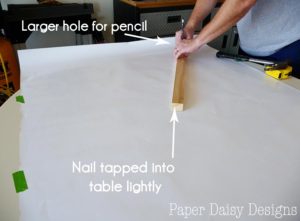
I got a scrap piece of wood and drilled a very small hole in one end for a nail. This is your constant point. Then I drilled another hole for the pencil at the distance of the radius of the circle.
It looked like this.
Now just rotate the pencil around the map, or whatever you desire to cut, until you meet the point where you started.
Then I carefully cut along the pencil line with sharp scissors. I felt pretty comfortable with this because of my years of experience in paper crafting. The best tips I can give you is to not “saw” your scissors and move the paper not the scissors. You’ll be surprised how much these two tips help you cut a smooth edge. I can generally cut a circle better with scissors than with an Exacto type blade.
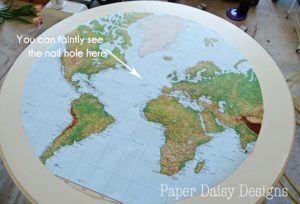
I carefully smoothed out the whole made by the nail and color matched a bit of acrylic paint to cover up any remaining traces.
I used Mod Podge Hard Coat to apply the map to the painted table. I quickly coated the back of the map, flipped it over used a bone folder to smooth it out. Later I came back and put two more coats on top. I chose the Hard Coat version because you can sand after coats and it is the most durable for furniture. I didn’t need to sand it any, it was pretty smooth finish. I had intended to apply a coat of wax on top like I did to the table itself, but I’ve yet to do it and it’s holding up fine.
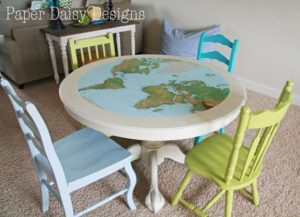
Here’s the final table and chairs.
The two other chairs were finds Emily and I hunted for at our local thrift stores. The chairs got a different colors.
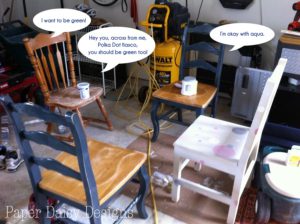
Once I had assmbeled all the chairs they sat in my garage like this for a while. 🙂
Once the colors were decided, I lightly sanded all of them and whipped the ones that weren’t getting the real deal Chalk Paint with Liquid Sandpaper. The blues were mixes of Louis Blue and a deep turquoise I had. Yes, you can mix Chalk Paint with other latex paints. I haven’t had any problems.
When I do mix a DIY chalk paint, I prefer to use Plaster of Paris, mixed with just enough hot water to get it smooth and then mixed with Sherwin Williams Sample quarts. They are cheap and the store is the most convenient thing to my house. And they are nice to me. 😉
The recipe I use is 3 parts paint, to 1 part Plaster of Paris, just enough hot water to mix the Plaster of Paris into a paste and then mix it into the paint.
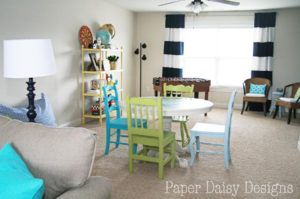
Here’s another look at the table from one side of the room.
Please feel free to visit the Media Room Tour and check the rest of the room out!
Thanks for visiting! I’d love to have you follow me on Facebook or Google +.
Sharing here.
Hooking up @House of Hepworths / Transformation Thursday @ Shabby Creek Cottage / Shabbilicious Friday @Shabby Art Boutique / Friday Link-up @ Redoux / Feathered Nest Friday @ French Country Cottage / Home Sweet Home @ The Charm of Home / Be Inspired Friday @ Common Ground / That DIY Party@ DIY Show Off / Home & Garden Thursday @ A Delightsome Life / Furniture Feature Friday @ Miss Mustard Seed / Wow us Wednesdays @ Savvy Southern Style / Sunday Scoop @ I Heart Naptime / Power of Paint Party @ Domestically Speaking / Keep Calm and link on @ Create Craft Love / Inspire Me Tuesday @ A Stroll Thru Life





12 Comments
Ann
May 17, 2013 at 2:52 amThis turned out great. The map table is so fun and the chairs are so fun. I've always wondered how to cut a oversized circle. I'm not a skilled paper crafter, so not sure I could cut a perfect circle. Your tips are fantastic, though. Thanks for sharing.
Taunnie
May 17, 2013 at 2:58 amI love your map table. Very cute and unique :. The colors of the chairs are perfect.
Taunnie
May 17, 2013 at 2:58 amI love your map table. Very cute and unique :. The colors of the chairs are perfect.
Taunnie
May 17, 2013 at 3:00 amI love your map table. It is so cute and unique. The chairs are perfect. Love the colors and the mix and match look.
Iris
May 17, 2013 at 11:44 amNice! Love this idea….and the talking chairs…will pin the table to my "Maps & Globes" Board<br /><br />Iris♥
marty (A Stroll Thru Life)
May 17, 2013 at 12:18 pmI love the idea of the map on the table, how fun is that. It looks amazing. Great tutorial too and such a pretty room. Thanks tons for joining Inspire Me. Hugs, marty
Debbie @ MeandMyDIY
May 21, 2013 at 1:51 pmGreat idea for cutting out a large circle Leslie! The table turned out great. I had to deal with swollen particle board on one of the kid's desks not long ago. It's always something, isn't it? Your map was a cleaver way to cover it up, and the chairs look so much better in their new colors! :)<br /><br />Debbie
Kathy A Delightsome Life
May 22, 2013 at 5:51 pmI think this is a wonderful and lovely idea. I would have loved this when I was Home Schooling the children. http://www.onemoretimeevents.com/2013/05/succulent-chandelier.html
Courtney ~ French Country Cottage
May 23, 2013 at 3:41 amWhat a charming table~ love it!! Sharing at the party tomorrow~ thanks for linking up at Feathered Nest Friday!
Sherry Thecharmofhome
May 23, 2013 at 4:27 amSuper cute table.<br />Thank you for joining Home Sweet Home.<br />Sherry
Kerryanne @ Shabby Art Boutique
May 23, 2013 at 10:07 amLove this idea Leslie. Thank you for sharing this project on Shabbilicious Friday. I will be featuring this at tomorrow's party, so please pop over and pick up a Featured button.
Michele Alger
May 25, 2013 at 7:58 amI am in total love with this map table! EXCEllenT Idea 😉