One Room Challenge Spring 2020 WEEK 3: Installing Tudor Paneling
If you are new to Deeply Southern Home, welcome! I am Leslie! My goal, whether in my home or my client’s, is to create rooms with a relaxed southern style. Although my designs are traditional, I love to experiment with color and a fresh interpretation of classic interiors. We recently downsized to a new-construction home and I can’t wait to inject old-world charm and character through my DIY projects and timeless finishes. I am honored to be a Featured Designer this season for the One Room Challenge™ and am waiting anxiously to share the final reveal on June 25!

You can visit all 8 of my previous One Room Challenges™ here.
Here we are my friends, it is WEEK 3 of the One Room Challenge™! This the week I give you give you some progress photos and share a tutorial for how to install Tudor style paneling.
This post is written in sincere gratitude to Novo Building Products for supplying all of the millwork for our One Room Challenge this season.
What is Tudor Paneling? What makes it different than board and batten?
I touched on this briefly in my design post from WEEK 2 but I thought I’d elaborate a little more now.
The answer is visible in the proportions and details. The panels tend to be taller, more narrow rectangles. They also have a fine, raised detail on the inside of each box.

Traditionally, Tudor paneling is constructed out of quartersawn oak. Sometimes you find a small rectangular inset where the rails and stiles meet.
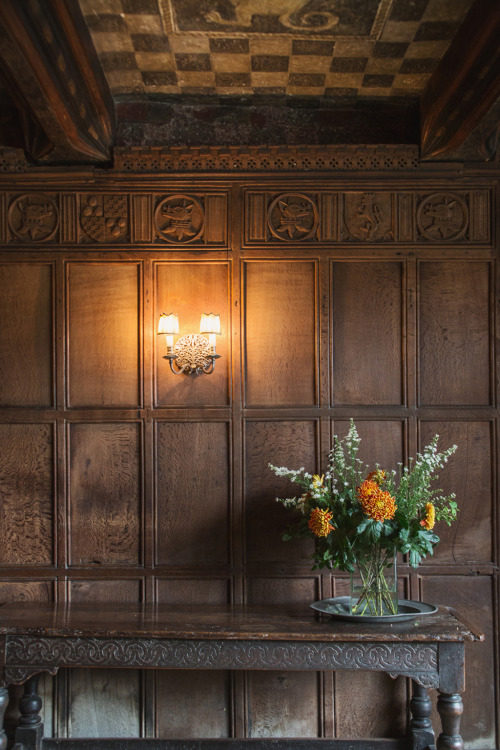

To update this look, I am painting my paneling. I think it is just as lovely.

Here is a sneak peek at one wall finished, at least for now.

How to plan your paneling.
I started planing the layout of the panels first with some tape on the wall fairly unscientifically.

Then I got to work. To determine the height of the paneling I found the height of the wall and then tried cutting it into thirds. That didn’t seam quite right, so I did a little more research and stumbled upon the Golden Ratio. It’s a fairly complicated equation that’s been around since the ancient Greece, but here is a link to the Golden Ratio Calculator I used.
After determining my top height, I worked downwards from there.
Once I had that basic measurements determined, I moved into drawing it to scale in Adobe Illustrator. Using a scale of Points equals an Inch, I was able to draw the room rather precisely as shown in this fireplace wall.

While planning your rails or horizontal pieces of moulding, be sure to also consider where switches and outlets fall on your walls.
We ended up moving only two outlets and one switch. As I shared in my Stories on Instagram recently, I was very excited to move that ill-placed switch anyway.
I had a visual, based upon all of my research in Tudor paneling, of the proportions. Working within the height of the room and how high I wanted the paneling to rise up the wall, I planned the space between the stiles to be xx ”

On all walls except for one, the spacing between the stiles, the upright vertical pieces of trim, was 12″. As seen below.

For the wall next to the kitchen it worked out better to create the rectangles at a distance of 11.5″. Making that modification is barely noticeable to the naked eye, but allowed us to miss both an outlet and a set of light switches.
At the very top of the paneling I wanted to use an Architrave instead of a basic flat cap that would be used in a standard board and batten installation.

I had planned to transition my standard 1×6 baseboard to the first rail with a base cap moulding.

Having a base cap would create a protruded transition that would allow the transition from one flat board to the next be intentional.
Here is what the sample piece looked like in a mock up on the wall.

Inside each rectangle after enlisting the help of a product specialist at Novo we found the perfect cap piece from Novo Building products to create that raised detail common in Tudor paneling I had become so obsessed with.


But then the Corona Virus pandemic altered my plans.
Both of those cap detail pieces became unavailable once the pandemic crept across the nation. Supplies and production of finger jointed moulding like these very specific pieces were completely unavailable.
So, like many of us, I’ve had to pivot and create the very best outcome with what I have been so graciously given.
Instead of the base cap moulding as the transition, I removed all of the shoe moulding and will be adding a new baseboard tall enough to cover the seam. Then I will put the shoe moulding back to hide any imperfections of the floor.

It’s a good bit of extra work, no doubt, but I think in the end it will look very nice. In the image above, the floor is not at all level so the new baseboard will need to be leveled up to the existing flat baseboard, which was installed level. The shoe moulding will cover any inconsistencies such as this.
Prepping the panels.

Once the moulding was delivered from Novo Building products, a major sponsor of the One Room Challenge™, I precut all of the stiles or vertical uprights to my desired height of 61″..

As I usually do, I cut them with a wooden guide or stop attached to my workbench to insure that each one is exactly the same size.
I also pre-painted each board. The thought process behind this is that it keeps you from having to cut in on each board and the wall when you are painting. Doing this not only allows you to just touch up paint where you need to nail or caulk. It has proven to be very successful in our previous installations.
However, as I will show you later, pre-paiting is not advised for flat panel installation.
How to Install Tudor Style Panel Moulding the Quick and Easy way
- Begin by painting your wall the final color of your moulding.

2. Then, install your bottom rail. I chose to make this one solid piece to have less seams.

3. Check for level and nail.

4. Add vertical boards or stiles. We created two “spacer boards” that were placed near the top and bottom of the stiles. Then, using a level we double checked that they were straight and plumb and nailed them in.
We repeated that process until we reached the end of a wall.
5. Then we topped the stiles with a finishing rail and the architrave.

For the rails, I was able to work on that alone. I pre-cut the rails in batches to make sure they all fit perfectly.
6. Just like the installation of the stiles, use a “spacer board” to quickly install the rails. Stand the “spacer board” on top of the bottom rail and then add the first rail, level and nail. This time the board was cut to 18.25″.
7. Repeat for the second rail and move on down the wall.
With all of the small rails cut in advance I was able to install this wall in under 10 minutes! I’ll be adding a video to my Instagram Stories in the next day or two and will also share it here.
Finishing and Painting
Because one day I am able to add the inside panel moulding, I am not using any caulk along the inside stiles and rails. Surprisingly, I discovered using MDF as our material here, the flex of the board allows you to really get it tight to the wall even with minor imperfections in the wall.
Here is where the pre-painting of the rails and stiles has likely come back to haunt me.
After testing many ways of patching the seams, I found the best option was this Spackling by Dap.

I tried another version of filler and caulk but it was not at all up to my standards of making the seams completely disappear. I know I am a perfectionist and having seams all around the room would have driven me crazy.

I should note that the seam where the horizontal and vertical boards meet had a larger gap than usual because of the rounded edge of the material. Remember, there was supposed to be a cap moulding covering most of it. However, in some ways I actually think it’s easier to hide the gap because of the space. From what I have seen in other board and batten style installations, if the two butt ends of a flat stock meet imperfectly, it is very hard to hide that imperfection.
While the DryDex spackling created the most perfect solution for filling the seams, sanding off the excess to get that nearly perfect transition is extremely messy. I have worked in one section at a time to keep the mess in one section of the room. Cleaning as I go around the room.
For nail holes, I do have an excellent solution no matter what type of millwork you are installing. Crawford’s Painter’s Putty.

it is so easy to use! All you have to do is roll a little ball of the putty in your hand and add the putty to the hole with your finger. Then with another finger I rub softly in a circular motion until the putty is smooth and level with the wood. It’s AMAZING!!

Here is a little bit of bad news I discovered on Tuesday. Even though I primed over the patched areas I still got some flashing of the spackle after I followed up after one top coat.

To remedy this, I went back and gave it all a light sanding with 220 grit sand paper and added another coat of primer. Then, I followed with another coat of paint.
Now it looks like what you see below. This is with no photo altering. It’s sad to think that all my prep work of painting the rails and stiles were for naught. But at this point, whatever it takes to have a beautiful finished product is what I am going to do.

Next week I’ll share more about the fireplace we are building. I am pretty certain this has the potential to become something a little controversial, but I am loving the way it is turning out!
Here is a list of all the items to be completed in the 8 weeks.
- Paint panel portion of walls – DONE
- Build fireplace structure -DONE
- Install paneling on fireplace, patch and paint – ALMOST DONE
- Remove existing flooring in fireplace -DONE
- Install tile in firebox
- Install tile for hearth
- Build mantle and surround for fireplace
- Install paneling around room, patch and paint – ALMOST DONE
- Hang custom drapery
- Refinish pair of side tables
- Hang chandeliers
- Install sconces
- Install 4 beams across ceiling
- Install new door hardware
- Arrange furniture on new rugs
- Sew or find lumbar pillows for sofas
- Hang art
- Style china cabinet
- Accessorize both the living room and the dining room
- Finish the “surprise” space
- Photograph the room
- Write 8 blog posts total
I really feel like at week 3 I should have more of these items checked off the list. Thank goodness for the extra time this season.
If you missed my week 1 post, you can find that here.
SPONSORS
A special thank you is necessary for my sponsors. They have graciously shared the products that will make this makeover possible.
Novo Building Products | Hudson Valley & Troy Lighting | Apt2B
Emtek | Loloi Rugs | Couristan | Calico | Overstock
The Tile Shop | Bemz | AZ Faux Beams | Romabio
Be sure to visit all of the talented Featured Designers for their week three updates.

A Glass of Bovino | Beginning in the Middle | Beth Diana Smith | Clark + Aldine | Coco & Jack
Deeply Southern Home| Design Maze | Dwell by Cheryl | Erika Ward | Home Made by Carmona
House of Hipsters | Hunted Interior | Kandrac & Kole | Kate Pearce | Katrina Blair | Liz Kamarul
Veneer Designs | Rambling Renovators | Renovation Husbands | Studio Plumb | Media BH&G
And then look for the Guest Participants on Thursday! It’s so very exciting that there are a record number of guest participants this year. How cool is it that over 350 blogger entries and 260 Instagram entries!! That’s a lot of room makeovers happening! I venture to say that these rooms will be evident that good things can come out of all of this time staying home.
Thank you to Linda, of the One Room Challenge™ and the official Media Partner, Better Homes and Garden for having me this season!!


Leslie you have been busy and it’s so worth all the effort! The tudor paneling look so good!! Love that you found the online tool to calculate the ratio and then mapped it all out so you know exactly what needed to be done (including moving that switch) prior to starting the process. Love that soft grey on the panels and I want to see more!!!
Thanks for the tutorial too. I may need to try it myself one day … there is one more room left in the condo!
OOh, you really should! Thanks so much!!
I can’t stand the seams either. Looks great!!!
Yes! I am positive that’s all I would see if I didn’t address them properly!!
Holy Moly girl! You are the queen! I will be following your posts again when we move to work on our dining room!
Thank you, Sue!
This paneling is giving this room so much LIFE! Love it
Thank you so much!! That was the hope. To bring your eyes down and make it feel cozy.
I used to hate panelings before but I have been appreciating them so much nowadays!
Very pleasing to the eyes! I want to have them installed in my house right now
Great Information. I like the way you explain the article. Thank you for sharing this information.
http://www.mortgagebrokerssanfrancisco.com/
This is a pretty exciting challenge!!!
I love the transformation of your space with the Tudor paneling! It adds such a beautiful texture and charm. Can’t wait to see how you style it next!
I absolutely love the Tudor paneling transformation! It adds so much character to the space. Can’t wait to see how the rest of the room comes together. Great work!
I absolutely love how the Tudor paneling is coming together! It’s such a unique choice and adds so much character to the room. Can’t wait to see how you incorporate furniture and decor with this stunning backdrop. Keep up the great work!
I absolutely love how the Tudor paneling is transforming your space! The depth and character it brings are just stunning. Can’t wait to see how you finish the room!
I absolutely love the look of the Tudor paneling! It’s such a unique and charming touch that really adds character to the space. Can’t wait to see how it all comes together in the end! Keep up the great work!
It adds such a layer of sophistication and architectural interest. It really shows how adding the right structural details can completely change the feel of a space. We aim for that same transformative effect in the backyard. If you ever want to bring that level of custom design to your exterior, a Malibu pool contractor can help you create a landscape that matches your beautiful interior.