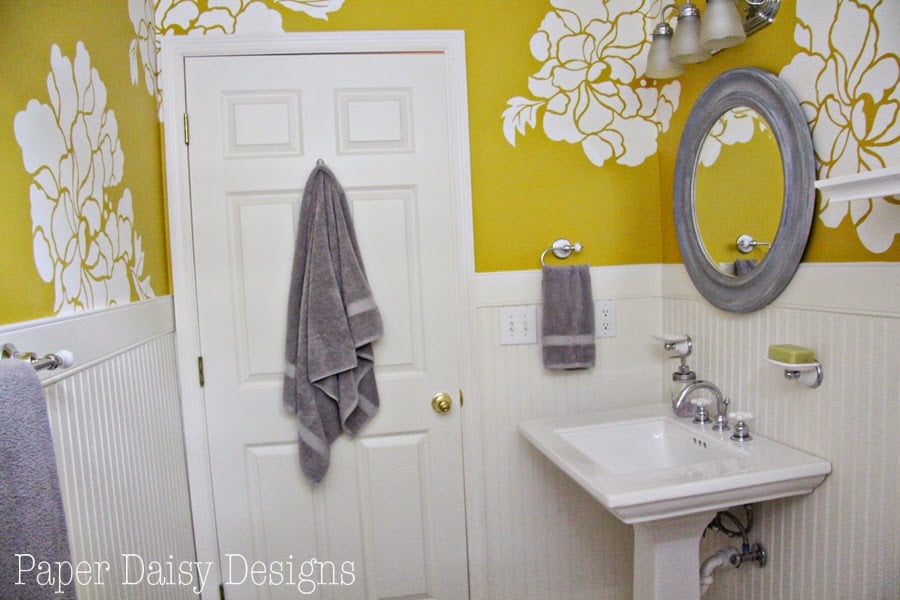
The One Roll Transformation
Today, I’m sharing the details on how to use one roll of expensive Anthropologie wallpaper to transform a space, namely a basement bathroom.
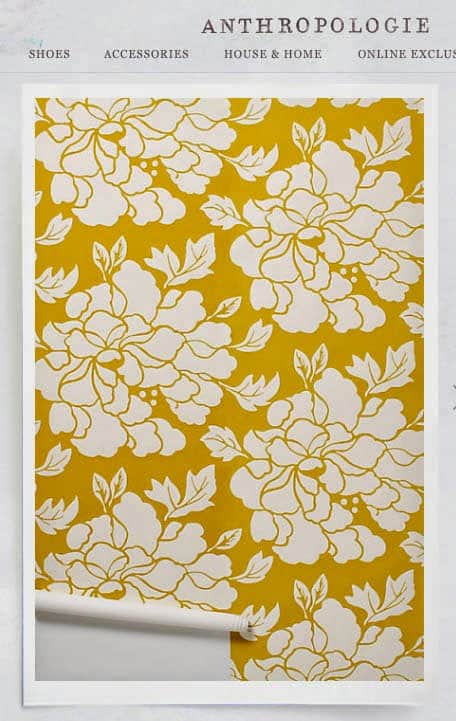
I was generously given one roll of this gorgeous wallpaper from Anthropologie. I shared the story behind how I was given this wallpaper in the reveal post.
Only after I had my heart set on hanging it in our guest bathroom, did I discover it would not be enough even for this tiny bathroom with bead board. I also knew that my chances of getting a matching lot of wallpaper, just like fabric, was zilch. Not to mention, I didn’t have the budget to buy the additional 3 rolls it would take to paper the room.
Determined to get the look I wanted and use what I had, I decided that I would cut out the enormous flowers and paint the wall the background color. I was so proud of my resourcefulness! Of course, I’ve never really hung wallpaper, so there was that.
Thankfully, the one close friend I’ve made since moving to Birmingham is somewhat of an expert wallpaper hanger and somehow I convinced her to help me! We literally could have done the whole project in one day. I painted the room while she cut the flowers out. After treating her lunch, we started papering. (We had to end the day early to do carpool.)
Here’s what you will need.
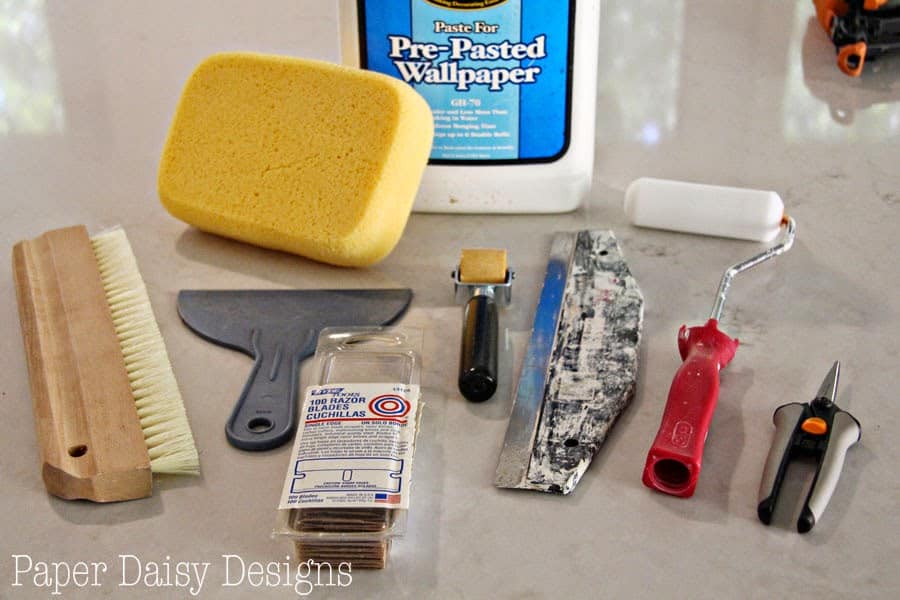
Sharp scissors
Wallpaper paste
Mini roller and pan for paste
Wallpaper smoothing brush
Plastic smoothing tool or putty spatula
Seam roller (Optional, in this case your finger works fairly well)
Paint and trim guide or straight edge
Razor blades
Sponge
Bucket of water
Ready for the steps to hang wallpaper cut-outs?
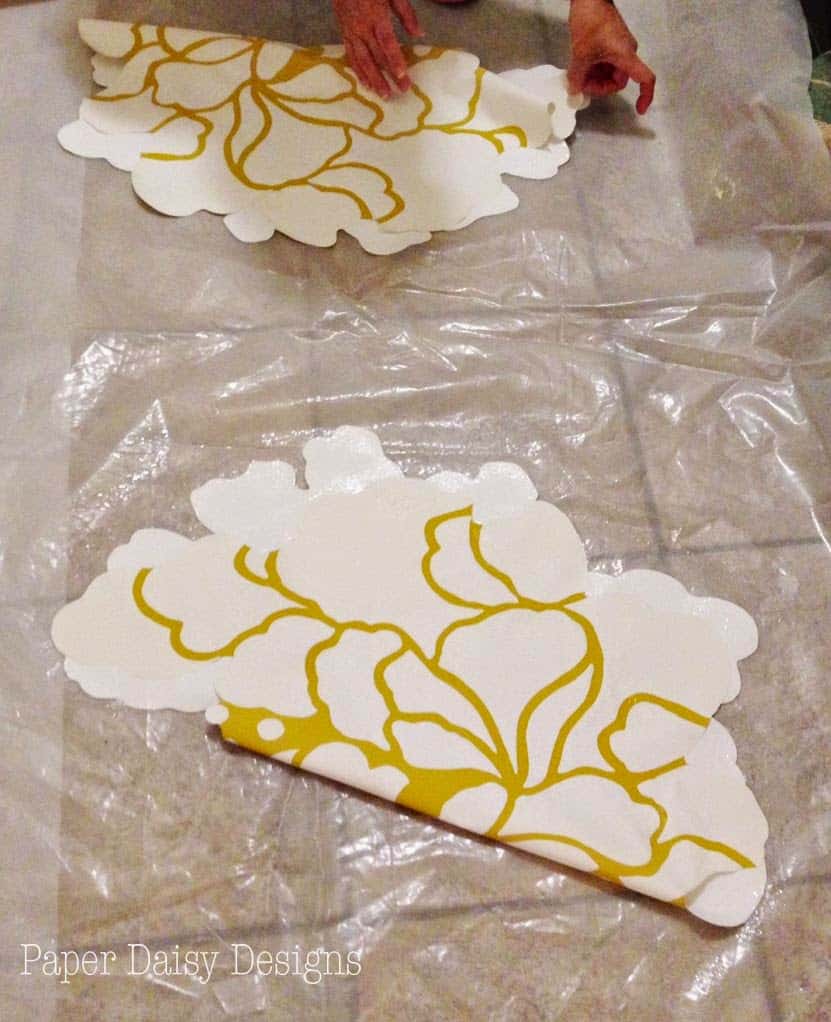
1. Paint wall color to match wallpaper. While it dries cut out designs.
We thought it was best not to leave a yellow bordered edge. We used just the white flower parts with a small piece connecting all the petals.
2. Decide on the spacing of the flowers and the overall design. Take into consideration fixed elements in the room.
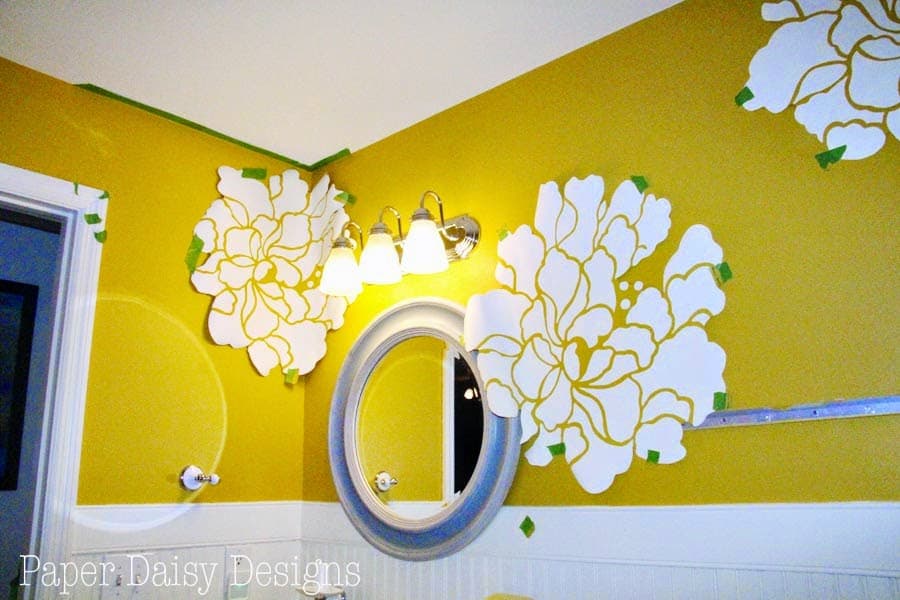
We used painters tape to temporarily hang the flowers on the wall, creating a random, kind of flowy pattern. I took photos of the exact positioning of each flower with my phone. As we began to paste, we only took down two flowers at a time.
3. Apply wallpaper paste to cut outs and “book it” for 15 minutes.
My experienced friend said the “booking” process allows the paste to soak into the paper. She also warned not to use border paste. A border paste is supposed to be used to adhere a border to wallpaper not a wall, therefore, it is a complete nightmare to remove from drywall.
4. Hang flower or design on wall starting at one edge. Using a wallpaper smoothing brush, slowly smooth out from center and that edge, working out any wrinkles. Use a delicate hand to avoid tearing the damp paper.
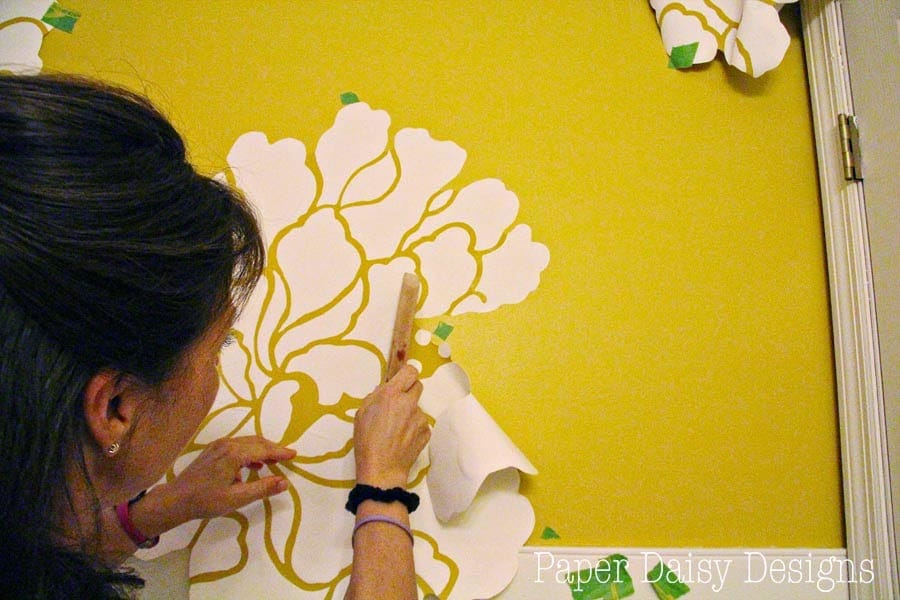
The pieces of tape you see at the edge of the flowers were used as a guide to specific points on the flower showing us exactly how wanted it line up on the wall.
5. Once your design is up, use a flat edged smoother. In our case, we used a large putty spatula.
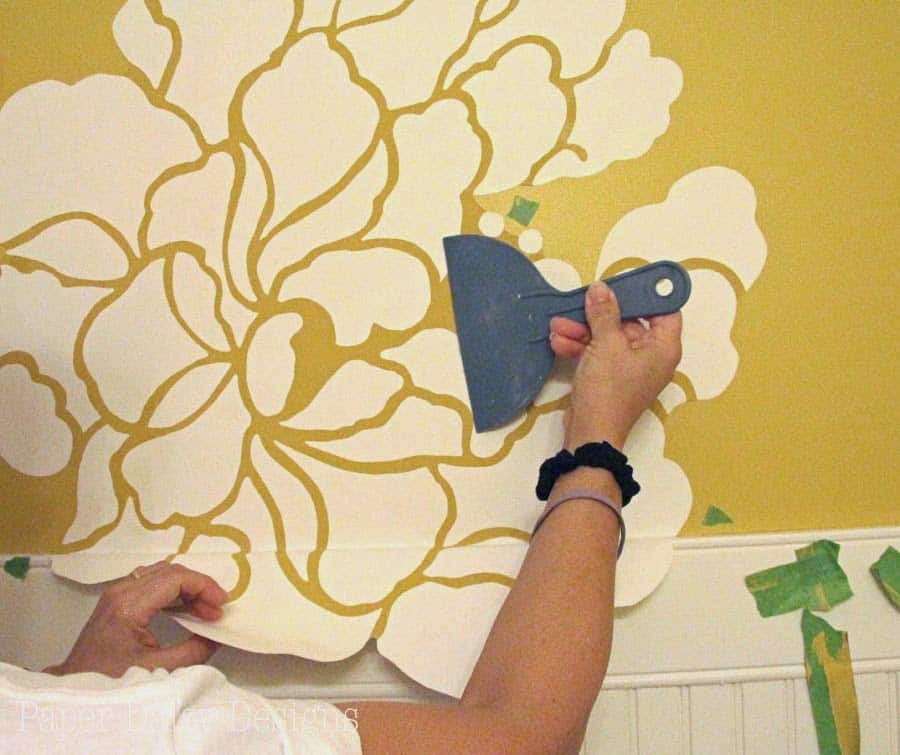
This step further smoothes paper, creating good adhesion to the wall and removes bubbles. Although you don’t want to use a too heavy of a hand here, especially if you use a seam roller as your last step. You could push too much of the paste out from behind the paper then it wouldn’t have enough glue to form a good bond.
6. Quickly wipe excess paste from the wall with sponge. Cleaning the sponge often.
Be very diligent on this step as this application of wallpaper as sticker cut-outs creates many opportunities for glue to seep out. My expert friend warned that dried wallpaper paste will make paint crackle. Not good!
7. Use a straight edge to trim overhang with a razor blade.
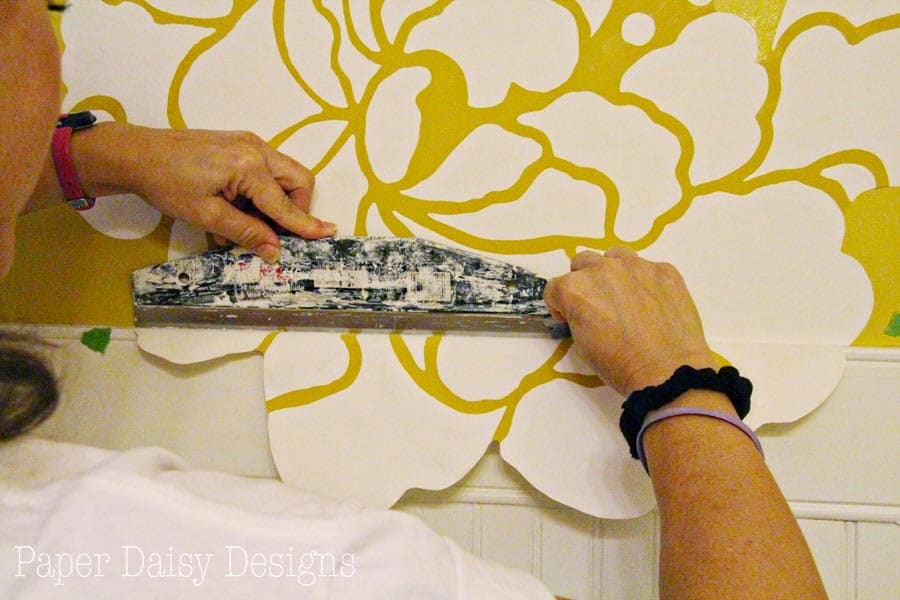
It is important to use a new blade nearly every cut. The blade must be very sharp or you will not achieve an easy, straight cut.
8. Double check to make sure you don’t have any excess glue or any bubbles. Wait for it to dry.
We found that we could start “booking” one flower while we hung the next. We did this around the room until we were done.
The next day, I decided where to add the leaves.
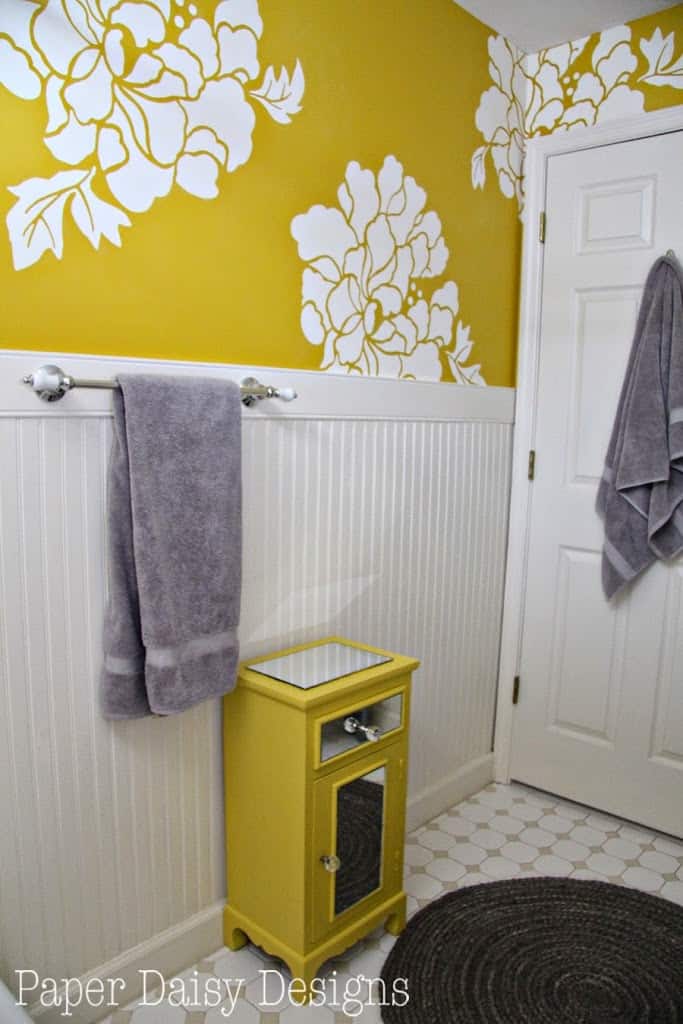
The whole process was much easier than I thought it would be and of course it was nice to have an expert on hand helping. It was kind of amazing the way once the paper was dry it became totally flat. You can hardly tell the whole room isn’t wallpapered.
In doing some research online right before we began, we read that this particular Paeonia wallpaper from Anthropologie is actually quite difficult to hang.
The seams have to be cut by hand and the pattern repeat is extremely large, creating a lot of waste and some comments even suggested using a wallpaper liner. It seemed that the consensus was to hire a professional. I was so thankful I didn’t decide to truly wallpaper the room after I read the comments.
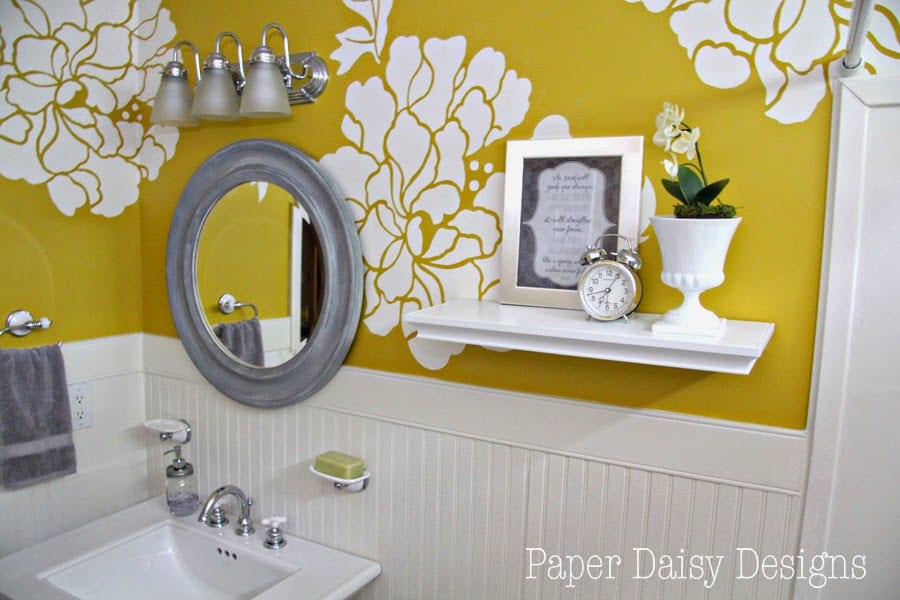
I think my much cheaper and definitely much easier version is just as beautiful, if not more restful looking.
What do you think? Ready to try your own wallpaper transformation?
If you want the complete source list please see the Bright Basement Bathroom Makeover post.


I ran across your post on Pinterest. This is absolutely beautiful. The large design in the wallpaper made your bathroom have such a gorgeous look. I have paneling so don't know if this would work for the room, but would love to have it on the one wall where my mirror is. I'm going for a shabby chic look so would want roses and smaller flowers. You are so good at this…what do you
Wow! I'm so impressed with this project. I never would have guessed it wasn't whole wallpaper. <br /><br />Thanks so much for sharing your ingenuity at the Best of DIY link party!
I love how bright and cheerful your bathroom is! Just by looking at the roll of wallpaper I had no idea those flowers were so large. It all came together so beautifully. How lucky you are to have a friend who knows a lot about wallpaper! Stopping by from the #bestofDIY party – and pinning 🙂
I love how beautiful your bathroom looks. I love yellow it's a happy color. Great project
This looks beautiful and what a great way to make a roll of wall paper cover more area!
Obviously, the first thing I did was look for the original wallpaper on Google. And I was disappointed, because the effect is basically the opposite of the one you got: even a headboard looks tiny and overpopulated with it!
So, my point is, you actually improved the Anthro design, and you’re probably the owner of the only room with this wallpaper that looks like it could be the cover of a magazine. Congratulations!
Giuliana, Thank you, what a super compliment! We love the space and hope our guests do too!
I TOTALLY AGREE GIULIANA!!! So very true. I love it and Im so shocked I never thought of this!! So very brilliant of you Leslie! It just looks wonderful. I apologize for my crazy silly amazement – I am just so astounded by it all. Haha… Seriously! lol Okay, I’m done now. 🙂 Keep it up chicky! ~ Allison
This LOOKS GREAT! And I am so very impressed and amazed at your thought process and YES… ingenuity . You, my friend, have tapped into one of your great, if not greatest, abilities. Using your mind and becoming an out of the box thinker. I am so impressed. I must use this technique in my bathroom, but I will DEFINITELY GIVE CREDIT TO YOU!!!! 🙂 KEEP IT UP!!! USE THAT NOGGIN GIRL! lol haha…. 😉
Allison, Your comments make me smile! Thank you!! Funny that you should note what I have discovered along this DIY journey, solving a problem or coming up with an inexpensive solution pushes me to be more creative and the results are often something I never would have initially thought of. Hope you’ll follow along!
Your version is MUCH better than the original. I love the breathing space between the flowers.
I just came across your wallpaper transformation via Pinterest and love the way it looks! What a great idea-using what you had on-hand to create your own version. I honestly don’t think I’d have thought of cutting out the big flowers myself, but it’s wonderful–even better than the original wallpaper. Thanks for sharing it with us. It inspires me to get busy working/re-doing my own mess of a bathroom.
Beautiful!!! I love hacks and this is now one of my favs! I really love the look you achieved more than the original wallpaper. Y’all did a fantastic job! Thank you for sharing with us!
I love how your bathroom turned out! Do you happen to know the color of paint that you used? I’m thinking of doing either a similar stencil or the same thing that you did for my hallway.
Lindsy,
The color is actually a match of the yellow in the wallpaper. But I took my Sherwin Williams deck to the wall and think that SW 6690 Gambol Gold is fairly close. For a color as intense as this I think I would be sure to test a sample in the space. This bathroom only has a very small window and is on the basement level so it could handle a bold color.
Hope this helps.
Leslie
Perfect! Thank you so much for the quick reply and inspiration. I’ll send you a picture of end result if I end up doing it! 🙂
Lindsy
You did an absolutely fabulous job! I like your idea even better than the all-over patterning. I think it’s a genius idea! Thanks!
Thanks! I see now that the wall paper comes in a lovely shade of blue. If I were to do it again I’d choose that! I love the yellow, it’s so bright and cheerful, but I’m a blue girl at heart.
I appreciate you taking the time to comment.
I’m so glad I found my solouitn online.