One Room Challenge Fall 2020 Week 2: The Laundry Room and Mudroom
Hopefully, I am welcoming you back to this season’s One Room Challenge. This season I am tackling our Laundry Room and Mudroom! Can I just tell you right off that I am thrilled to have an organized and highly functional laundry room and mudroom.

If you need to get caught up on the inspiration and the background of where these rooms started, I invite you to go back to Week 1.
If you are new to Deeply Southern Home, welcome! I am Leslie, a self-professed creative junkie turned home decor and DIY blogger. After working as a graphic designer for several years I took a very, very early retirement to raise our children. Along the way, I found myself as a creative blogger. My goal, whether in my home or my clients, is to create rooms with a relaxed southern style. Although my designs are traditional, I love to experiment with color and a fresh interpretation of classic interiors. We recently downsized to a new-construction home and I can’t wait to inject old-world charm and character through my DIY projects and timeless finishes.
This spring, I was honored to be a Featured Designer and this season marks my 10th One Room Challenge! That’s a lot of amazing rooms that have been transformed thanks to this bi-annual event!
Be sure to follow me on Instagram @deeplysouthernhome and my Facebook page Deeply Southern Home for behind the scenes on Stories, and sign up to receive my blog posts straight to your email inbox by clicking here.
ABOUT THE ONE ROOM CHALLENGE & PREVIOUS ROOMS
In case you have never heard of the One Room Challenge, it is an amazing biannual event where 20 featured designers are chosen to makeover rooms and share their progress. In addition, hundreds of Guest Participants also join in the challenge with the encouragement of other participants to complete a room in their home. If you’ve ever wanted the motivation to finish a room the One Room Challenge helps you get it done!
Most importantly this is not a competition. It is a community supporting one another in an effort to create rooms we love and provide that ever important sanctuary in our homes, in whatever way that looks for you!
You can see my previous seasons and get a recap of the nitty-gritty behind the scenes by checking out the One Room Challenge tab at the top of the blog.
This season I am so thankful to have Build.com as a major sponsor for this makeover. Paint sponsor is Sherwin Williams, featuring their new Emerald Designer Color Collection.
Building out the Laundry Room
Most of the changes this week happened in our laundry room. In the very unique times we are living in, I decided to bring in my trusted contractor to do the large projects. When I work on client projects he is my go-to for almost every project. He is thorough, precise, reliable and everyone who meets him is thoroughly impressed by his skill and professionalism. And yes, if you hire me I will refer him to you.
But let’s take another look at the BEFORE.


If you remember, the plans included two walls of built-in units to be added. And added they were! I still need to trim it all out and of course paint but they are built!


Progress
On the washing side, the base for the dog washing station was built as well as the large boxed bases that house the washer and dryer.

The the leftover space to the right of the washer and dryer is a stepped back shelving unit that will house all the taller items like brooms, mops and vacuums.

It will be left open for easy access to the water lines and dryer vent. I also think the shelf above will be perfect for all of my detergents and laundry supplies.
On the opposite side, the main goal was storage and functionality of the room.

I threw a couple of baskets up for an idea of what might fit. If you follow me on Stories, then you know I was trying to plan for the basket situation in advance.

TIP: When you are building any type of custom shelving unit in which you know you will use baskets to contain items, it is always best to seek out those baskets before you build. It makes it so much more efficient to find baskets you like and then customize your shelves for those baskets.
You can see that the existing double base cabinets were split to accommodate the dog washing station and still provide counter space on both sides of the room.

Last week, I kind of glossed over the addition of a drying rack. It will be added to this opening to cover the electrical panel.

I haven’t sketched up the actual plans but it will need to be a custom version of something like this one from Pottery Barn.
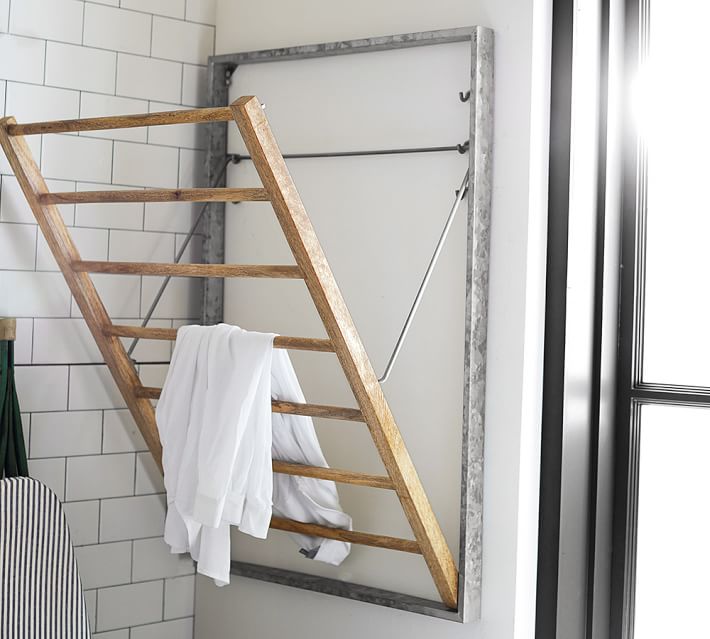
By incorporating a fold-out design I gain the function of a drying rack while still being able to access the electrical panel when necessary. Of course, I plan on painting the electrical panel the wall color to help it nearly disappear back there.
Small Progress in the Mudroom
There is only a little to show you in here. I painted the base of the bench so it could be installed properly and the board and batten could be added on top.
I also stained and finished the top of the bench.
I spent a few minutes today considering how I want to build out the board and batten and shelf.
I have these beautiful shelf brackets from Osbourne Wood Products left over from our Pantry project that I would like to use as support for the shelf over the bench.

I think what is tripping me up is I am not sold on the brackets being placed between the battens. With the moulding I want to use at the top I believe this is the best and easiest solution. I’m just not certain I like it. I think painting it all in the same color will help.
The only other option is to add the brackets on top of the batten but then the decorative piece at the top, an architrave, doesn’t work.
Finding a Vintage Sliding Door
On Tuesday and Wednesday afternoon, I hunted the local Habitat for Humanity and Antique Malls for an old door to add to slide between the mudroom and the laundry room.
On Wednesday, I finally hit a little bit of luck stumbling upon this door.

It is in rough shape, no doubt, but what I love about this door is the striking similarities to the sliding door I added to the pantry in the Fall 2019 One Room Challenge for our kitchen.
The door I found for the pantry had the same exact weird grill too! I removed it and the glass that had been modified. I hired a local artisan to create a leaded glass window in a diamond pattern, popular in Tudor architecture.


The original wood was stripped through a tedious process that I will not repeat this time. You can read about what I did wrong last time, in this post.
If I decide to purchase this “new” door, I will likely paint it instead of stripping it. It turned out the pantry door was made out of a wood that had a very pink undertone. It took a great deal of trial and error to find the right finish to minimize that undertone.
Here is my dilemma and sticking point on getting that particular door. It is a 36″ door and I don’t have 36″ in the opening next to the door frame to accommodate the door entirely.
I placed a piece of wood where the door would end, overlapping the door frame, if I cut about an inch and a half off the door’s sides.
You should know that the door will likely remain open at all times, at least partially, so that our dog Freddie can have access to his water and food bowls.
The area left for the opening would be 29″ which is about the size of a small door, similar to the opening for our guest bathroom. So while it’s not tight, it does make the room appear smaller from the mudroom hallway.
I would love your feedback. Please add a comment with your thoughts and options below. I am truly at a loss for what to do at this point.
Here is a running list of the projects for this project.
Laundry Room
Build built-in storageBuild a dog wash base- Add moulding and finishing details
- Prime and paint built-ins
- Build drying rack
- Build dog feeder
- Install ironing board
- Install dog food bin
- Install plumbing in the dog wash
- Tile dog wash
- Grout dog wash
- Install brick wall on washing side
- Grout brick wall
- Prime and paint brick wall
- Change the hardware on cabinets
Mudroom
- Finish moulding on bench
Paint benchBuild bench topStain and finish bench top- Re-paint tall cabinet
- Install board and batten
- Install shelf and hooks
- Paint walls
- Find sliding door
- Paint or finish sliding door
- Hang sliding door/sliding door hardware
Be sure not to miss the Featured Designers and their virtual projects with High Point Market. Also, visit the hundreds of other Guest Participants linking up their projects each week!!


This season I am so thankful to have Build.com as a major sponsor for this makeover. Paint sponsor is Sherwin Williams, featuring their new Emerald Designer Color Collection.


#1 I’d trim the door that insignificant amount as I don’t think the opening will look too narrow with the door fully opened.
#2 congrats coming up with the drying rack idea! Have you thought of making a “door” to cover that area when neither the rack is needed or access to the electric panel isn’t needed? My experience with painting the door is a marginal improvement as paint scrapes off the moment the panel is accessed so now you are stuck with a scraped wall. Or maybe my painter was just inept ????
This is so much progress! I’m doing our laundry/pantry room for the ORC too and have NOT made this much progress lol
Also what software did you use for your mockup/rendering? It looks great!
How did you add or plan for a drain on the dog wash?
When the house was built we had them rough in plumbing for a potential sink in the future. The plumbing then, just needed to be moved over down the wall for the new location.